LabSat 3 GNSS Simulator User Manual
This page intentionally left blank Page | 2 Revision 1.
Contents Introduction........................................................................................................................................... 4 How does it work? ..................................................................................................................... 4 Components .......................................................................................................................................... 5 LabSat 3 Front ............................................
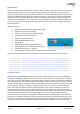
Introduction LabSat 3 is a lightweight, portable record and replay system for GNSS testing. With the ability to record real world GNSS signals directly to SD card or HDD storage, the LabSat 3 is a simple to use, fully stand-alone system. Recorded signals can be replayed back by LabSat 3 in the Lab enabling development and testing of most types of GNSS equipment. Alternatively SatGen software can also be used to create simulated GNSS signals from map or user defined trajectory.
Components LabSat 3 has been designed to be portable and simple to use allowing virtually anyone to gather field test signals without in depth training. Recording GNSS signals is as simple as positioning the antenna and pressing one button. The sunlight-readable graphic display gives instant feedback of record status and can show live histogram data to verify satellites in view during recording. Back at the Lab, recorded signals can be replayed at the push of a button for repeatable, reliable testing.
LabSat 3 media LabSat 3 file formats LabSat 3 uses I&Q binary data and runs the FAT32 file format. LabSat 3 files are recorded into a folder with separate 2GB data files which will run sequentially when replayed. The folder description GPS_000 will contain several files with the name format GPS_000_000.ls3. These will automatically increment. LabSat 2 (.ls2) and LabSat (.bin) files will need to be converted to this format to play on LabSat 3.
Quick start guide In addition to this guide, a short LabSat 3 Quick Start video is available on the LabSat 3 SD card and also on the LabSat 3 HDD. Example of Replay - using the included SD card with preloaded scenario. Briefly press the power button to power up the LabSat 3. Connect from the RF output on the rear of the LabSat 3 to your GPS system antenna input. With the SD card inserted, use the UP/DOWN arrows to select a file. Press the PLAY button to start replay.
Menu Layout File → Info - Display file info for selected file. → Delete – Delete selected file Yes/No. → Format SD/USB – Erase and Format SD/USB Yes/No. Constellation → → → → GPS/GAL – Tick to select GPS/Galileo constellation for recording. GLONASS – Tick to select GLONASS constellation for recording. BeiDou – Tick to select BeiDou constellation for recording. 2Bit – Record with 2bit quantisation when single constellation is selected. → → → → Loop – selected file will replay continuously.
Replay operation in detail LabSat 3 uses SD card or HDD memory for storage and playback of GNSS data. It is important to note that Class 10 or higher cards must be used to sustain the transfer speeds required. Racelogic recommend SanDisk Extreme Class 10 cards for best performance. The 500GB USB Hard Disk Drive (HDD) supplied contains a selection of pre-recorded scenarios from around the world. These scenarios can easily be copied to the SD card for replay. The HDD supports either USB2.0 or USB3.0.
Record operation in detail LabSat 3 uses SD card and HDD memory for storage and playback of GNSS data. It is important to note that Class 10 or higher cards must be used to sustain the transfer speeds required. When recording two constellation types, the data rate is approximately 8.2MB (Mega Bytes) per second. To ensure that data is collected without error, the card should be able to sustain 10MB per second. Spare cards and HDDs may be purchased from Racelogic.
Navigating the LabSat HDD file layout Below is a guide to how the folder layout works on LabSat 3. This example below shows the folder layout on the HDD provided with LabSat 3. The LabSat USB HDD is uses multiple folders. When folders are detected LabSat will display them in a similar fashion to a PC using the DIR indicator. When USB media is connected LabSat 3 will scan for files and display the files/folders containing the .ls3 format.
Battery operation and charging LabSat 3 variants that include internal battery use replaceable Varta Li-Polymer battery packs. These packs are fully certified (UL, CE, UN38.3 Transport). Each pack gives around 2 hours of record time. When the LabSat 3 is powered externally, it will charge the internal battery pack if fitted and seamlessly switch over to battery operation when external power is removed. Alternatively, an external battery charger is available to order.
Battery fitting, removal and handling → Replace battery with Racelogic, Part No. RLACS201 only. Use of another battery may present a risk of fire, explosion or other malfunction. → Caution: The battery used in this device may present a fire or chemical burn hazard if mistreated. Do not disassemble or heat above 100°C (212°F) or incinerate. → To remove or change the battery disconnect from mains power. Remove the holding plate market “Battery” on the rear of the unit.
External reference clock input LabSat 3 features an external reference input for synchronization to a 10MHz clock. To use this feature, connect a 10MHz reference signal with minimum +6dB level to the REF IN SMA connector and ensure that the External 10MHz reference clock option is ticked in MENU SETUP CLK REF External 10MHz. When the external reference input is enabled, the symbol will appear in the top right corner of the LCD.
Expansion connector The EXPANSION connector on the rear of LabSat 3 gives access to a number of signals including CAN Bus, RS232, 1PPS & Digital input/output. Accessory RLACS202 is used to provide user signal access for integration into the users test system.
CAN Bus LabSat 3 is capable of listening to, and recording data from, two separate CAN networks. Dual channel CAN Bus data recording with LabSat 3 can be achieved in two ways. Depending on the mode selected, the CAN signal will be either digitized and re-created on a raw bit level or decoded and recorded in a time-stamped text file. The CAN mode operation is selected under the menu option ‘CAN’ in the SETUP section. When ‘digitized’ mode is selected, the channel is configured in the ‘Digital’ menu.
The log file is recorded in the same folder as the RF data and has a .TXT file extension. During recording, the CAN controller listens to the CAN bus and stores incoming data. LabSat 3 will transmit acknowledge pulses on the bus in response to correctly received data unless the ‘Silent Record’ option is ticked. The ability to transmit acknowledge pulses in ‘LOG FILE’ mode means that it is possible to record data directly from inertial sensors or other devices with a CAN bus output.
Digital in/out For recording events from an external source, LabSat 3 is equipped with a digital input (DIGI) and digital output (DIGO) which can be found on the expansion connector at the rear of the device. Digital input is pulled up externally to 5V. Digital out is a 5V level output. To enable the digital input for recording, go to MENU SETUP DIGITAL CH1 and then enable the tick against ‘Digi’ in the signal list.
Ordering information Description LabSat 3 unit LabSat 3 carry case LabSat scenario 500GB hard disk drive VBOX mains adapter 32GB SDHC Card USB3.
Converting LabSat scenarios LabSat uses a binary Intermediate Frequency, to down convert GPS RF data into a binary file, whereas LabSat 2 & 3 store GNSS RF data as an I & Q binary file. This means that existing LabSat scenarios cannot be run natively on a LabSat 2 or vice versa. The LabSat scenario converter software included on the LabSat 3 HDD will convert LabSat, LabSat 2 and LabSat 3 files to each other’s format.
Recommended media It is recommended to use good quality Class 10 UHS-I SD cards or higher spec. The following list includes SD cards that have been tested with LabSat 3. Description SanDisk Extreme 128GB SanDisk Extreme 64GB SanDisk Extreme 32GB SanDisk Ultra 8GB LabSat Part number RLACS211 RLACS210 LS03SDCARD - The LabSat HDD is the only recommended HDD to use with the LabSat 3 system. The hard drive is available as an accessory under the part number LS03HDD.
SatGen software A short Video introducing the capabilities of SatGen software can be found on the LabSat 3 SD card and also on the LabSat 3 HDD. SatGen software is a powerful tool for defining and creating RF playback scenario files for use with the LabSat Simulator. For many applications LabSat 3 can record and playback real world, live sky data, but there may be times when you need a more controlled, user definable signal.
Troubleshooting guide Restart → Should you need to restart the LabSat 3 unit for any reason please hold down the power button continuously for at least 30 seconds. Release the button and then press again briefly to switch device on.
LabSat 3 specifications LabSat 3 Single constellation LabSat 3 Dual constellation LabSat 3 Triple constellation Constellation GPS, Galileo, SBAS, QZSS, GLONASS or BeiDou GPS, Galileo, SBAS, QZSS, GLONASS or BeiDou GPS, Galileo, SBAS, QZSS, GLONASS or BeiDou Output Signal Level Adjustable from -83dBm to -115dBm Adjustable from -83dBm to -115dBm Adjustable from -83dBm to 1 2 3 RF Constellations RF Constellation Centre Frequency 1575.4/1602.00/1561.
Connector pin data Lemo Power Connector Connector 1: PWR PIN In/Out 1 I 2 I Type: LEMO 2 pin Description Power + Ground Range 8V to 30V 0V SMA connectors: RF OUT, RF IN and REF Connector: SMA PIN Centre NAME RF IN RF OUT REF Chassis - Type: SMA Description RF Signal including DC bias for active antenna RF Signal Output DC Blocked 10MHz Reference clock Range Bias output 2.8V to 3V 10.000MHz +6dB Ground Expansion port 36 way MDR type connector See Expansion connector section for more detail.
LabSat 3 dimensions The LabSat 3 dimensions in millimetres. Page | 26 2015 Revision 1.
Contact information Racelogic Head Office Unit 10, Swan Business Centre, Osier Way Buckingham Bucks MK18 1TB United Kingdom Racelogic Deutschland Postplatz 5 35781 Weilburg Germany Racelogic USA 27240 Haggerty Rd, Suite E17 Farmington Hills MI 48331 USA Contact: Mark Sampson Contact: Leander Speth Contact: Reid Scott Tel: +44 1280 823 803 Fax: +44 1280 823 595 Tel: +49 6471 927 996 Fax: +49 6471 927 770 Mobile: +49 1736 790000 Email: labsat@racelogic.