
Instruction Manual

INSTRUCTIONS
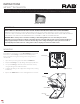
WP1LED™ INSTALLATION
RAB Lighting is committed to creating high-quality, affordable, well-designed and energy-efficient LED lighting and controls that make it easy for electricians to install
and end users to save energy. We’d love to hear your comments. Please call the Marketing Department at 888-RAB-1000 or email: marketing@rablighting.com
010V DIMMABLE WIRING TROUBLESHOOTING
CLEANING & MAINTENANCE
DIMENSIONS
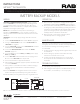
For 0-10V Dimming, follow the wiring directions as shown in Fig. 3.
1. For Junction Box Mount, feed wires through silicone wiring plug
into the junction box.
2. Connect the black fixture lead to the (+) LINE supply lead.
3. Connect the white fixture lead to the (-) COMMON supply lead.
4. Connect the GROUND wire from fixture to supply ground.
Do NOT connect the GROUND of the dimming fixture to the
output.
5. Connect the purple fixture lead to the (V+) DIM lead.
6. Connect the pink (or gray) fixture lead to the (V-) DIM lead.
7. Cap the yellow fixture lead, if present. Do NOT connect.
1. Check that the line voltage at the fixture is correct. Refer to
wiring directions.
2. Is the fixture grounded properly?
3. Be sure the photocell, if used, is functioning properly.
CAUTION: Be sure xture temperature is cool enough to
touch. Do not clean or maintain while xture is energized.
1. Clean lens with non-abrasive glass cleaning solution.
2. Do not open the fixture to clean the LED. Do not touch the LED.
PINK (or GRAY)
LIGHT
FIXTURE
Vaux 12V
YELLOW
GROUND
GROUND
( - ) DIM V
( + ) DIM V
COMMON
LINE BLACK
WHITE
PURPLE
8 1/2”
216mm
8 1/2”
216mm
6 3/4”
172mm
WP1LED
Fig. 3