
Instructions

INSTRUCTIONS
WP1 XFU, WP2 XFU, WP3 XFU
WALL MOUNT
IMPORTANT
READ CAREFULLY BEFORE INSTALLING FIXTURE. RETAIN THESE INSTRUCTIONS FOR FUTURE REFERENCE.
Min 90 °C SUPPLY CONDUCTORS.
WARNING: Make certain power is OFF before installing or maintaining xture. No user serviceable parts inside.
WARNING: Do not use an electric generator to test LED xtures.
CAUTION: For proper weatherproong function, all gaskets must be seated properly and all screws inserted and tightened.
This is important with an uneven wall surface. Silicone all plugs and unused conduit entries.
For wet location compliance, xture must be properly sealed. For moisture seal, apply silicone caulking between the
mounting surface and back housing, as well as around the sides of the housing. This is important with uneven wall surface.
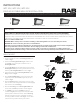
WP1 XFU 29W
Housing Screws (2
Fig. 1.
Housing Back Plate (Fig. 2)
Plug
Housing Back Plate
Foam Gasket (provided)
Housing Back Plate
Housing Back PlateFig. 3
Housing Back Plate
Plug Fig. 4
Housing Back Plate
(supplied by others) Screws (supplied by others)
Fig. 5
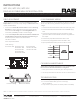
Housing
Fig. 9
Housing.
Housing Housing Back Plate
2) Screws (provided) Fig. 6.
Conduit Conduit
Fig.4)
Housing
Fig. 9
WP2 XFU 29-40-60-80-100W
WP3 XFU 50-120-150W
Housing
Screws (2)
Housing
Housing Back
Plate
Foam Gasket
Plug
Housing
Screws (2)
Conduit