
Instructions

4" 6" 8" 10" Recessed Commercial Downlight FA
Note: These instructions do not cover all details or variations in equipment nor do they provide for every possible situation during installation, operation or maintenance.
and end users to save energy. We’d love to hear your comments. Please call the Marketing Department at 888-RAB-1000 or email: marketing@rablighting.com
INSTRUCTIONS
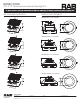
Fig: 10
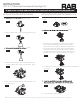
5. Remove J-Box metal plate with existing lamp ballast. Do
not dispose. Disconnect all wires from the ballast. (Fig.4)
6. Remove the existing lamp metal conduit (MC) cable from
the J-Box. (Fig.5)
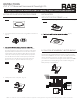
10. Install the junction box cover plate (with lamp ballast still attached
to it). (Fig.9)
12. Turn power ON and start saving $$.
the ceiling. (Fig.10)
9. Wire nut the ground (green) wire in the junction box. Wire
nut the black input wire with the black wire from the MC
cable and wire nut the white input wire with the white wire
from the MC cable. Wire nut the purple input wire with the
purple wire from the MC cable and wire nut the pink input
wire with the pink wire from the MC cable. If the purple and
pink wires are not in use, cap these with wire nuts.
(Fig.8)
Fig: 4
Fig: 8
Fig: 9
Fig: 6
Fig: 7
Fig: 5
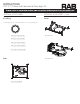
2. Remove CFL, Incandescent or HID lamp.
3. Remove reflector from rough-in (mounting frame). (Fig.2)
(Fig.1)
Fig: 1
(Fig.3)
Fig: 2
Fig: 3
INSTALLATION WITH EXISTING FRAME INSTALLATION WITH EXISTING FRAME (cont’d)
7. Select desired lumen and CCT level using switch on driver box.
(Fig.6)
(Fig.7)