
User Manual


NOTCHCELL 20W OPERATING MANUAL
R-tron America, Inc. Page: 25 / 57
4) Installing/ tying the feeder cable
The installation of the feeder cable is sensitive to the bend radius and humidity.
Therefore, the following regulations shall be observed.
Maintain the minimum bend radius. (Higher than the standard presented by the
manufacturers)
The cable must not be entangled.
Do not apply excessive force to the feeder cable to prevent bent insulated conductors or
dug coverings.
The outer connecting part of the connector must be waterproof.
Tie the cable at every 50cm.
Tie the cables firmly so that they shall not be affected by external impact.
Use the bending machine if required to bend the cable.
Cut the feeder cable with a hacksaw and clean out the cut area.
5) Feeder cable connector
The followings shall be observed at the assembly of the feeder cable connector.
Cut the feeder cable carefully to prevent the inflow of water, steel and lead strip, or dust.
Clean the connector and the gasket connector to keep airtight.
Do not apply excessive force nor work in a hurry.
Avoid connection work at the time of rain. If it is unavoidable, be careful to prevent the
inflow of rain to the connecting part of the feeder cable connector.
All the connector parts must be waterproof.
Install the 1/2” feeder cable by inserting it into the shield cable and 36mm flexible
conduit. In case of the 7/8”feeder cable, install the cable only.
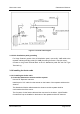
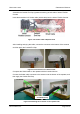
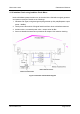
The installation of the 1/2” feeder cable is as follows
Cut the 1/2”feeder cable, Shield cable and 38mm Flexible Conduit in a necessary length.
Insert 1/2”feeder cable into the Shield cable, and then assemble the connectors at both
ends.
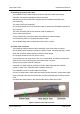
Compress the Shield cable on the Antenna side with the Heat Shrink Tube.
Figure 3.19 Shield Cable and Connector