CDMA MINI (RSN-CDMA-23) User’s Manual 1
Notice Trademark R-tron is a registered trademark of R-tron Inc. Other products and company names mentioned here in this manual might be trademarks or trade names of their respective owners. Copyright Copyright © R-tron Inc. 2000-2009 All Rights Reserved Any reproduction, distribution, or revisions of any or all portions of this manual is prohibited without written permission from R-tron Inc. Notice This document describes the specifications, installation, and operation of the CDMA repeater.
Safety Precautions Opening the CDMA equipment could result in electric shock and may cause severe injury. Connect the equipment frame ground to building ground. Operating the CDMA with antennas in very close proximity facing each other could lead to severe damage to the repeater. RF EXPOSURE INFORMATION A minimum separation distance of 7.9 inches (20cm) must be maintained between the user and the external antenna of repeater to satisfy FCC RF exposure requirements.
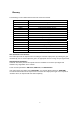
Glossary The following is a list of abbreviations and terms used in this manual.
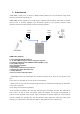
1. Introduction CDMA MINI is used to fill out areas in CDMA mobile systems, such as base station fringe areas, business and industrial building, etc. CDMA MINI receives signals from a base station, amplifies and retransmits the signals to mobile stations. Also it receives, amplifies and retransmits signals in the opposite direction.
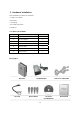
3. Hardware Installation The installation procedure is as follows: • Check List of Items • Mounting • Grounding • RF Cable Connection • Power On 3.
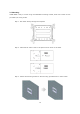
3.2 Mounting CDMA MINI is easy to mount using the assembled mounting bracket, which has 4 holes for the provided 5/16” fixing screws. Step 1 : Drill holes directly through the template. Step 2 : Install the set anchor bolts or the plastic anchor bolts on the holes. Step 3 : Attach the mounting bracket to the wall using provided bolts or extra screws.
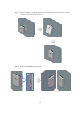
Step 4 : Lean the CDMA to hang the topside of the Guide Ring on the mounting bracket, and push toward the wall to mount. Step 5 : Fix the CDMA MINI using 8 screws.
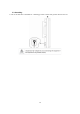
3.3 Grounding A rod on the left side is intended for a building ground. Connect the ground cable to the rod.
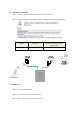
3.4 RF Cable Connection Step 1 : Connect a cable from a donor antenna to the Donor Antenna Port. Step 2 : Connect a cable from a repeater’s service antenna to the Server Antenna Port. Model Max Gain Minimum required isolation (@Max Gain) CDMA MINI 50dB to 80dB 3.5 Power On Step 1 : Connect the power cord. Step 2 : Plug the power cord into a wall outlet. Step 3 : Check if the green LED at the Top turns on.
This repeater follows the below set-up algorithm automatically right after POWER ON < Auto easy-setup Procedure> The below algorithm shows how to control Gain, Input / Output Power Level, Service band, ALC Level, ASD Level and path direction by using keypad 18 display panel.
19
5. Troubleshooting Before contacting your service dealer, please make sure you refer to the following guide. If the CDMA MINI does not work normally after completing the following troubleshooting, please contact your local dealer or service center. Problem Cause Solution No LED on Check the power cord for secure connection. Cannot communicate Redo the ‘4.2, Network Setup’ of this with the repeater. manual. If communication still does not work, please contact Technical Support. Web site: www.
7.
Warranty LIMITED WARRANTY This product, as supplied and distributed by R-tron, in the original carton, is warranted by R-tron against manufacturing defects in materials and workmanship for a limited warranty period of: Five (5) Year Parts and Labor This limited warranty begins on the original date of purchase, and is valid only on products purchased and used in the United States.
Return Material Authorization(RMA) Procedure The return and exchange of products are not allowed without prior approval from R-tron America, Inc. Please follow the exchange procedure below. 1. Call Tech Support for troubleshooting. 2. If the device has a hardware problem, R-tron will replace it if it is within warranty. A RMA number will be issued for the return. 3. R-tron will ship the replacement and a return label will be provided. 4.