
User Manual


R&M Materials Handling, Inc.
4501 Gateway Boulevard
Springfield, Ohio 45502
% : (937) 328 -5100
FAX: (937) 325 -5319
8/11
R&M Materials Handling, Inc. reserves the right to alter or amend the above information without notice.
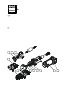
4.1 Adjustment of Compact-brake air gap
• Switch off and lock out power at the main switch.
• Check for any live power at the motor.
• Remove the power supply plug (8) from the motor.
• Open the motor cover (7).
• Push the brake disc (4) and measure the air gap between the adjustment nut (6) and aluminum ring
(5). The air gap has to be 0.2 - 0.3 mm. If needed, adjust the air gap by turning the adjustment nut
(6).
• Reinstall the brake cover (7) and plug in the power supply plug (8).
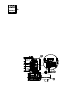
4.2 Removing the Compact-brake
• Switch off and lock out power at the main switch.
• Check for any live power at the motor.
• Unplug the power supply plug (8) from the motor.
• Open the motor cover (7).
• Unscrew the adjustment nut (6) for the brake air gap.
• Remove the brake parts. If the thickness of the friction material is less than 5 mm, replace all the
brake parts.
• Reassemble in the reverse order.
• Adjust the brake air gap. Refer to the 'Adjustment of Compact-brake air gap’ section.
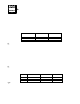
4.3 Removing and inspection of DC-brake
c_trmobr3b
1. Power supply plug
2. Motor cover
3. Brake mounting screws
4. Brake friction disc
S. Thickness of brake friction disc