
Owner`s manual


17
FIREPLACE INSTALLATION (cont.)
FIREPLACE ASSEMBLY - STEP BY STEP
CAUTION: Fireplace components are heavy.
CAREFULLY handle all components during
assembly.
Note: A Cordova Fireplace with a 16" Rectangle Bullnose
Hearth is depicted here. Your assembly may slightly
vary depending on model and hearth selected.
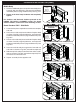
Hearth and Base Body
1. Locate the hearth pieces in an appropriate location (refer
back to the LOCATION section if needed).
2. Arrange the hearth pieces in their proper position.
Carefully align the pilot holes, and insert the hardware
(large hardware kits) in the order shown in Fig. 17-1.
Hand tighten, then use two
3
/
4
" open end wrenches (or
equivalent) to fasten.
Note: Most hearth pieces have access openings that allow
for assembly. Certain larger model pieces do not
have these openings. The assembly will need to
be performed with the hearths carefully tilted onto
their back.
3. Place the base body piece on top of the hearth. Carefully
align the pilot holes, insert the hardware (large hardware
kits), and only hand tighten at this stage. See Fig. 17-2.
Connect Gas Supply
Important: Before installation, be sure the gas supply
(propane or natural) is turned off at its source.
Important: Locate the gas supply line out of pathways
where people may trip over it or in areas
where the line may way be subject to
accidental damage (if applicable).
The fi replace has a key valve pre-installed on either the right
or left side of the fi replace. For fi replaces that have the rear
gas line option, a
1
/
2
" rigid gas pipe is pre-installed to the
valve and protrudes out of the rear of the unit.
(A fl ex connector is pre-attached to the key valve on the
interior of the fi replace. An R.H.P. burner is to be connected
to it at a later time.)
1. Route the gas supply (natural gas, household propane,
or from an L.P. Cylinder) to the unit as applicable.
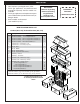
For rear installs, see Fig. 17-3.
For underneath installs, see Fig. 17-4.
Observe all codes and ensure all appropriate connections
are used to properly connect the gas supply. Apply only joint
compounds that are resistant to all gasses to all male pipe
fi ttings except fl are fi ttings. Make sure to tighten every joint
securely and properly leak test at all connections.
Important: This fireplace does not accommodate
propane cylinders. If a cylinder is used it must
be located in a safe location.
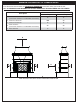
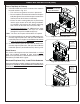
Fig. 17-1 Assemble hearth
Fig. 17-2 Assemble base body
Fig. 17-3 Route gas supply (rear install)
(key valve
location
may vary)
Fig. 17-4 Route gas supply (underneath install)
(key valve
location
may vary)
Key valve
Flex
connector
Connect
here
Key valve
Flex
connector
Connect here
(from below)
See Parts List for
large hardware
kit qty. for hearth
chosen
Hardware:
Large
Bolts x 8
Nuts x 8
Washers 16