
Owner`s manual


16
FIREPLACE INSTALLATION (cont.)
FIREPLACE ASSEMBLY - OVERVIEW
CAUTION: Fireplace components are heavy. CAREFULLY handle all components during assembly.
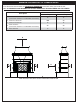
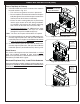
• Fig. 16-1 provides an overall orientation and bolt assembly detail for the Cordova fi replace.
(16" Rectangle Bullnose Hearth shown. Assembly may slightly vary depending on model and hearth selected.)
• The Reduced Cordova & Grand Cordova assemble in the same manner.
• The Grand Cordova has the addition of side walls, which are addressed in the following step-by-step section.
• This section is just an overview, refer to the following step-by-step section for complete assembly
and installation details.
Fig. 16-1
Cordova Overall
Orientation
Cordova Fireplace w/
16" Rectangle Bullnose
Hearth shown
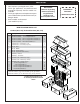
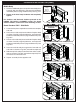
ASSEMBLY / INSTALL OVERVIEW
1. Assemble hearth
2. Attach base body
3. Connect Gas (not shown)
4. Attach middle body
5. Attach side walls
(Grand Cordova only, not shown)
6. Install fi rebox liners
7. Attach top body
8. Attach chimney
9. Grout seams (not shown)
10. Install burner (not shown)
2
4
1
6
7
8
1 1