
User's Guide
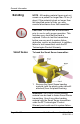
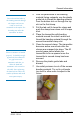
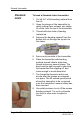
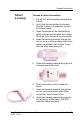
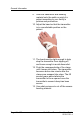
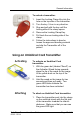

Table Of Contents
- Warnings
- Cautions
- Overview
- Intended Audience
- Contact Information
- Product Warranty
- Introduction
- Transmitters
- Transmitter Types
- Warranty Expiration Date
- Banding
- Using an Umbilical Cord Transmitter
- Discharging
- Transmitter Testing
- Transmitter Cleaning and Care
- Replacing the Clamp
- Smart Sense Transmitter
- Standard Infant Transmitter
- Patient (Locking) Transmitter
- Umbilical Cord Transmitter
- Transmitter Tester

General Information
Safe Place Transmitters User Guide Page 13 of 33
0510-1121-J
2. With the yellow-side of the banding
material facing outwards, use the plastic
guide tab to thread the banding material
from the bottom slot out through the top
slot on the first clamp.
3. Pull the tab until it clears the clamp and
push the clamp lever down until it snaps
shut.
4. Place the transmitter with banding
material around the infant’s ankle and
thread the banding material through the
second transmitter clamp slot.
5. Close the second clamp. The transmitter
becomes active one minute after the
clamps are snapped into place. The 60
second grace period allows the
transmitter to be re-opened once the
transmitter’s second clamp has been
secured.
6. Remove the plastic guide tabs and
discard.
7. Use safety scissors to cut off the excess
banding material. Try not to cut bands
too short to allow room to adjust in the
future.
Do not thread both sides of
the banding material through
the clamps until you are
ready to secure the
transmitter to the infant
. Pre
-
threading may allow the
transmitter to alarm.
Ensure transmitter is banded
properly. It should fit snugly
against the skin without an
air gap between the
transmitter and skin, yet
allow the band and
transmitter to be turned on
the ankle. Over-tightening
the band will not reduce the
number of alarms and could
cause patient injury.