
User's Manual


CHAPTER 1 Installing Hardware Components
Quick Response Premiere Wireless Call System Hardware Installation Guide Page 19 of 64
0510-1099-E
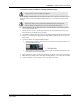
Mounting the Dome Light
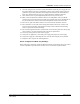
Dome Lights are mounted in the corridor above or beside the door of an associated room. The
red light should be mounted up. Location should provide for unobstructed visibility of the
Dome Light in both directions. Dome Lights can either be flush mounted or surface mounted
based on wall construction and wire routing. When flush mounting, the wiring can be routed
through a 3/4" hole in the wall. In this case the Dome Light will be directly mounted to the
wall.
WARNING: Before cutting openings or drilling holes through walls, you must
verify that you will not strike any wiring or plumbing.
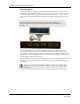
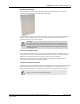
To surface mount the Dome Light
1. Hold the base of the surface mount enclosure against the wall at the desired mounting
height with the sharpened side parallel and square to the floor.
2. Mark the location of the two mounting holes.
3. Drill holes where the marks were made. If the drilled holes do not hit a stud wall you must
use wall anchors (not included).
4. Line up the holes on the base of the enclosure with the newly drilled holes.
5. Mount the base of the enclosure to the wall using two drywall screws.
6. Snap the surface mount enclosure onto the base previously attached to the wall.
7. Terminate the wires per the instructions following this section.
8. Once the Dome Light has been wired route any excess wiring back into the enclosure as the
Dome Light is placed over it.
9. Secure the Dome Light to the surface
To flush mount the Dome Light
1. Terminate the wiring per the instructions following this section.
2. Route any excess wiring back into the wall, as the Dome Light is placed over the hole and
against the wall.
3. Once the Dome Light is square to the floor, secure it to the wall with the two screws
provided.
4. If screws do not hit a stud, then drywall anchors (not included) will be necessary.