
User's Manual


CHAPTER 1 Installing Hardware Components
Page 18 of 64 Quick Response Premiere Wireless Call System Hardware Installation Guide
0510-1099-E
To flush mount the single gang enclosure for the 32 Channel Controller
1. Locate a mounting site for the 32 Channel Controller, preferably on a wall
that a single gang electrical box can be mounted.
2. Hold the single gang mounting enclosure against the wall. Use standard
installation practices to position and level the enclosure then mark out the
area around the enclosure.
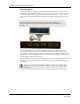
WARNING: Before cutting openings or drilling holes
through walls, you must verify that you will not strike any
wiring or plumbing.
3. Using a drywall hole saw, cut out the area where the enclosure is to be placed. Be sure that
the area is only as big as the enclosure or the clamps will not attach securely to the wall.
4. Run the wires from the CPS and Dome Lights to the hole.
5. After routing the wires through the single gang electrical box place the clamps flat against
the box and insert the unit into the wall.
6. Tighten the clamps using the provided screws.
7. Where necessary, mount the enclosure to a wall stud by screwing or nailing the enclosure
to the side of the stud through the two provided holes.
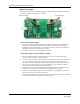
Mounting the 32 Channel Controller
To mount the 32 Channel Controller enclosure
1. Using an Phillips screwdriver, remove the six screws that hold
the face plate to the enclosure.
2. Remove the faceplate.
3. Thread wires through the hole in the back of the enclosure.
4. Secure the enclosure to the single gang mounting enclosure with
two screws (the third hole on the enclosure is for extra mounting
security).
5. Terminate the wires from the CPS and Dome Lights per Wiring
Diagram on page 19.
6. Route the Router to the 32 Channel Controller Cable Harness from inside the 32 Channel
Controller to just outside the enclosure.
7. Connect the Router cable harness. At this point do not power up Router and allow it hang
free. It will be mounted to the wall following system power up.