
User's Manual


CHAPTER 1 Installing Hardware Components
Quick Response Premiere Wireless Call System Hardware Installation Guide Page 7 of 64
0510-1099-E
Installing Components
Install the Central Server
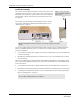
The first step in the installation of the hardware components is to set up the Central Server. The Central
Server computer can be placed on a flat surface, and the monitor may be mounted on a wall. Optional
wall mounting kits are available from RF Technologies (PN 0120-0097 and 0120-0098). These
mounting kits comply with VESA mounting standards. Please follow the manufacturer's instructions for
mounting the monitor.
WARNING: When installing the Central Server, proper placement/mounting of
the server is important. Adequate precautions must be taken to prevent the server
from falling, causing injury to persons. Cables must be routed in a way to prevent
tripping hazards.
Any rack mounted Central Server must be installed in a controlled
environment that maintains temperature between 50°F and 95°F and humidity
between 20% and 50%.
1. Check to see that you have all the required equipment for setting up the Central Server.
15 Gigabytes (GB) of free hard disk space
RF Technologies configured computer
Monitor
Keyboard
Mouse
UPS (uninterruptable power supply)
Printer (optional)
Remote connection hardware (if applicable)
2. Set up all the components of the Central Server.
3. Plug the components into the back of the Central Server (monitor, keyboard, mouse, printer).
4. Power the Central Server using a Plug-in Power Supply with a battery backup unit (UPS). The UPS
should be plugged into a backup generator outlet.