
User's Manual


CHAPTER 1 Installing Hardware Components
Page 6 of 64 Quick Response Premiere Wireless Call System Hardware Installation Guide
0510-1099-E
Installation Checklist
1. Read this guide in its entirety before proceeding with the installation.
2. Review the floor plan of the facility and make sure the equipment shipped to you matches what is shown
on the floor plan.
3. Walk through the facility and determine the physical location of all components of your system, compared
to the floor plan.
4. Determine how the Gateway(s) and Routers are going to be powered.
a. If the device is going to be powered by the CPS (refer to Figure 4.1 on page 65 to choose the
appropriate wire size).
b. If the device is powered using wall outlet power supply, an available outlet must be located near the device
(refer to Figure 4.2 on page 65 to choose the appropriate wire size).
5. Install System Components
Install the Central Server
If applicable in your facility, install the Client computer(s)
Install the Gateway
Install the Routers
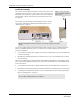
6. Install transceiver devices. Transceiver devices transmit and receive data.
Mount all fixed devices (i.e. Pull-Cords, Smoke Detectors, Door/Window transceivers).
Enter transceiver information into the software (refer to the applicable Series Software User and
Administrator Guides).
7. Using the software, define the options, or system-wide settings to be applied to your facility’s Quick
Response Premiere Wireless Call System.
8. Test the operation of the system.
Test the software.
Test the system for sufficient coverage.
Test the operation of the Supervision function.