
User Manual
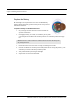


Table Of Contents
- Important Warnings
- Bio-Incompatibility Notice
- Compliance
- Introduction
- About this Guide
- Additional Detailed Documentation
- Contact Information
- Product Warranty
- Chapter 1
- Introduction
- Installation Checklist
- Installing Components
- Install the Central Server
- Install the Gateway
- Install Routers
- Place a Pendant into Survey Mode
- Determine Placement of Routers
- Quick Look Router
- Gateway/Router Reset Button
- LED Sequence
- Gateway/Router Channel Default
- Additional Gateway/Router Installation
- Changing Channels
- Router Depth
- Rebuild Subnet on Scanned Devices
- Scan Devices
- Chapter 2
- Introduction
- Transceiver Devices
- LED Light Indicator
- Installing Transceiver Devices
- Pull Cords/Emergency Call
- Check-in Pull Cord
- Pull Cord Transceiver with Extended Battery Pack
- Wall Mount Emergency Call
- Universal Transceiver
- Tamper
- Nurse Call
- Door/Window Transceiver
- Door/Window Transceiver with Reset Button
- PIR Sensor
- Smoke Detector
- Pendant Transceivers
- Activate the Battery
- Set up the Pendant
- Reset the Pendant
- Verify the Pendant Appears in the System
- Replace the Battery
- Test the System Operation
- Chapter 3
- Introduction
- Device Failure
- Router Failure
- Gateway Failure
- Chapter 4
- Specifications
- Power Cable Run Lengths
- Mesh Network Router/Gateway
- Quick Look Display for Quick Look Router
- Pendant Transceiver
- Pull Cord
- Nurse Call
- Door/Window Transceiver
- PIR Sensor
- Smoke Detector
- Universal Transceiver

Chapter 2: Installing Transceiver Devices
42 9600 Series Wireless Call System (0510-1078-D) - Hardware Installation Guide
Replace the Battery
RF Technologies uses only Panasonic 3.0 V Coin Cell Lithium Battery
model # CR 2032. This battery provides 10 to 30 percent more power than
other batteries in this size.
To replace a battery in a Pendant transceiver
1. Use your fingers to remove the back cover of the Pendant and
expose the circuit board.
2. If changing the battery, use a small, non-conductive piece of plastic
or wood to push the 3V Lithium coin cell battery from the rear of the battery holder until it pops
free.
3. Press the blue button a few times ensure no charge is remaining in the circuits.
4. Insert the 3V Lithium coin cell battery into the battery holder. Be sure to align the positive (+) end
of the battery as marked on the battery and battery holder.
5. Verify communication by observing the LED light.
6. Snap the back cover back onto the Pendant.
NOTE: Do not use a metal screwdriver or metallic instrument to remove the battery. This
may damage the device.