
User Manual


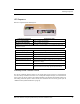


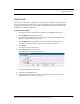
Table Of Contents
- Important Warnings
- Bio-Incompatibility Notice
- Compliance
- Introduction
- About this Guide
- Additional Detailed Documentation
- Contact Information
- Product Warranty
- Chapter 1
- Introduction
- Installation Checklist
- Installing Components
- Install the Central Server
- Install the Gateway
- Install Routers
- Place a Pendant into Survey Mode
- Determine Placement of Routers
- Quick Look Router
- Gateway/Router Reset Button
- LED Sequence
- Gateway/Router Channel Default
- Additional Gateway/Router Installation
- Changing Channels
- Router Depth
- Rebuild Subnet on Scanned Devices
- Scan Devices
- Chapter 2
- Introduction
- Transceiver Devices
- LED Light Indicator
- Installing Transceiver Devices
- Pull Cords/Emergency Call
- Check-in Pull Cord
- Pull Cord Transceiver with Extended Battery Pack
- Wall Mount Emergency Call
- Universal Transceiver
- Tamper
- Nurse Call
- Door/Window Transceiver
- Door/Window Transceiver with Reset Button
- PIR Sensor
- Smoke Detector
- Pendant Transceivers
- Activate the Battery
- Set up the Pendant
- Reset the Pendant
- Verify the Pendant Appears in the System
- Replace the Battery
- Test the System Operation
- Chapter 3
- Introduction
- Device Failure
- Router Failure
- Gateway Failure
- Chapter 4
- Specifications
- Power Cable Run Lengths
- Mesh Network Router/Gateway
- Quick Look Display for Quick Look Router
- Pendant Transceiver
- Pull Cord
- Nurse Call
- Door/Window Transceiver
- PIR Sensor
- Smoke Detector
- Universal Transceiver

9600 Series Wireless Call System (0510-1078-D) - Hardware Installation Guide 17
Installing Components
Router Depth
It is important to install Routers to minimize the number of hops to the Gateway while still providing
coverage at the furthest point from the Gateway. The Router Depth option allows you to adjust Router Depth
by staggering 5-second Router resets by one, two, three or four minutes. Each Router has an association limit
of 6 Routers; the hop limit for each Router is 4.
To select the Router Depth
1. From the Server computer running the Series 6.0 Software, select Tools from the Menu Bar.
2. Select Configuration from the drop-down menu.
3. If necessary, use your identification card or enter your Login and Password. Press Enter or click
OK. The System Management home page opens.
4. Select Configuration.The Configuration page opens with links to the Configuration menus.
All devices recognized by the system are listed in the Configuration Device window.
5. Select Devices.
The Configuration devices window opens.
6. Click the Properties box next to the Router.
The Configuration Device Properties window opens.
FIGURE 1.4: Configuration Device Properties
7. Select the Router depth from the pull-down.
8. Click Save and the Close the window.
9. Once the Router Depth is selected, you must do a rebuild the subnet on scanned devices. (See
“Rebuild Subnet on Scanned Devices” on page 18.)