
User's Manual
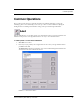
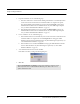

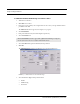
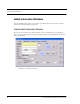


Table Of Contents
- Federal Communication Commission (FCC) Compliance
- Industry Canada Compliance
- Overview
- 9450 System
- Quick Response (QR) System
- Integrated Care Management (ICM) System
- Intended Audience
- Additional Detailed Documentation
- Contact Information
- Product Warranty
- Chapter 1
- Introduction
- Central Server and Client Computers
- Quick Look Display
- 9450 System
- Exit Alarm Controller
- Card Reader Access Device
- The Exit Alarm Zone
- Exit Alarm Receiver
- Magnetic Reed Switch
- CodeLock Electromagnetic Lock
- Alarming Band Receivers
- Alarming Band Zone
- Transmitters
- Wander Management Transmitter
- Alarming Band Transmitters
- Mother Transmitter
- Quick Response System
- Wireless Receiver
- Repeater
- Locator
- Paging Base
- Back-Up Interface
- Pendant Transmitters
- CodeWatch Transmitter
- Pull-Cords
- Check-in Pull Cord
- Smoke Detector
- PIR Sensor
- Door/Window
- Universal Transmitter
- Code Alert ICM System
- Gateway
- Router
- Transceivers
- Pull-Cords
- Nurse Call
- Door/Window Transceivers
- Smoke Detector
- PIR Sensor
- Universal Transceiver
- Pendant Transceivers
- Asset Transceiver
- Fall Management System
- Fall Management System Control Unit
- Fall Management System Sensor Pad
- Advanced 3-Way Care Solution
- Advanced 3-Way Control Unit
- Advanced 3-Way Care Sensor Pads
- Motion Sensor Pad
- Incontinence Sensor Pad
- Messaging Services
- Event Messaging
- Messaging Delays, Retries and Escalation
- Walkie-Talkie System
- Chapter 2
- Introduction
- Start the Software
- Window Conventions
- Touchscreen Monitor
- Quick Reference Tutorial
- Map Orientation
- Ruleset for Displaying Patient Name
- The Main Window
- The Menu Bar
- Monitor
- Tools
- Messaging
- Asset
- Help
- Top Toolbar
- Bottom Toolbar
- Low Battery Icon
- Chapter 3
- Introduction
- Commonly Used Terms
- Login and Passwords
- Units
- Device Supervision
- Global Lockdown
- Common Operations
- Admit
- Admit Information Windows
- Patient Admit Information Window
- Asset Admit Information Window
- Admit Information Tabs
- Patient Main Information Tab
- Discharge
- Escort
- Transfer
- Adjust
- Reports
- Silence

Chapter 3: Using the Software
54 Series 6.0 Software (0510-1065-A) - User Guide
Insert a Picture
The Picture tab allows you to insert a picture of the patient or asset being admitted. The patient’s picture is
displayed on patient generated reports. When available, the patient’s picture also appears in the Event Information
window for Cut Band, Door, and Check Transmitter alarms as well as alarms generated from Pendant, Fall
Monitoring and Incontinence devices.
All of the pictures in the system are stored on the P: drive on the Server. When you need to enter a picture for a
patient, go to the P: drive.
1. To insert a picture, click or press the (...Browse) button.
2. Select a picture from the Browse Picture Files dialog box.
To save a picture to the P: drive on the Server
1. Insert the removable media (USB drive).
2. On the Computer Desktop, double-click My Computer.
3. Double-click the removable media.
4. Right-click the pictures on the media you want to access and select Copy.
5. Double-click P:.
6. Double-click Pictures
7. Double-click People or Asset
8. Right-click and select Paste to paste the pictures to the P: drive for access.
IMPORTANT: All pictures must be placed in the P: directory. If you are using a digital
camera, removable USB drive, or any other removable media, you must first save the picture
file to the P: directory before removing the media.
It is the responsibility of the customer to have the system work on their domain which
governs the security access to their network.