
User's Manual

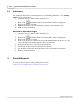
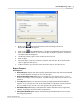
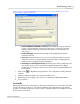

Table Of Contents

Users/Participants
60
Qwizdom Actionpoint 2007
11.
Enter the name of the class and click on
Save
.
8.1 Groups
Groups are necessary for certain games.
Creating Groups
1.
Select the class, in the
Class
drop-down menu, you want to create groups for.
2.
Click on the
Groups
button. The
Group Management
window will open.
3.
In the
Automatic Grouping Options
tab, select the
Grouping Action
.
·
Balance
-groups students by ability
·
Group Similar
-groups students evenly; one team may be odd depending on
the number of students in your class
·
Random
-groups students randomly; groups may be odd/even
·
Group Size
-specify the number of students in each group
Assign Members Based On
-you are able to assign partners based on ability and
performance
·
Activity Score
-based on overall grade on a particular activity
Select an Activity
-use this drop-down menu to select the activity when you are
assigning partners based on selected activity performance.
·
Predefined Ability Rating
-based on participants capability of learning
4.
Under
Grouping Action
, select
Balance
.
5.
Select
Overall Performance
under
Assign Members Based On
.
6.
Click on
Generate
and then click on
Done
when finished.
You can click on students to drag and drop them into different groups.
8.2 Seating
The seating chart is used to track student seating and needs to be completed to take
attendance. See
Attendance
for more information.
1.
Select the class you want to setup the seating chart for.
2.
Click on the
Seating Chart
button to bring up the seating chart. The
Seating
Chart
window appears.
3.
Student names will be in a column on the right.
4.
Click and drag the name of a student to place them onto the seating chart.
5.
Click on
OK
when you are finished.