
User's Manual
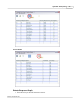
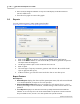
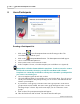
Table Of Contents

Qwizdom Actionpoint User Guide59
Qwizdom Actionpoint 2007
into presentation mode.
Creating an Anonymous List
Before using an anonymous list, be sure you have the correct estimated number of
remotes set within the
Configurations Settings
window. For example, if you create an
anonymous list with a hundred participants but only have eighty as the estimated number
of remotes, then not all remotes will register.
1.
Select an activity, answer key, etc. to present.
2.
Click on the
Present
button. The
Presentation Setup
window will appear.
3.
Click on the
Participant List
drop-down list and select
Anonymous
.
4.
Enter in the number of participants. The anonymous list has been created.
In
Configuration Settings
, check to make sure the estimated maximum number
of remotes reflects the number of the participants (or higher).
e.g If you have 32
participants but 24 as the estimated maximum number of remotes, then only 24
remotes will be allowed.
5.
Click
OK
to begin presentation.
Editing an Existing Participant List
1.
Click on the
Users/Participants button in the floating toolbar. The
Users/Participants
window opens.
2.
Click on the
Participant Wizard
button. The
Participant
wizard will appear.
3.
Select "
Browse and Modify Existing List
."
4.
Click on the
Browse
button. The
Open
window will appear.
5.
Search for the participant list you want to edit.
6.
Select it and click on
Open
. The name of the participant list will appear in the
Name
field.
7.
Click on
Next
. You will be taken to
Participant Field Selection
. You may add new
fields or remove existing fields. If you do not want to change anything, skip to the
next step.
8.
Click on
Next
. You will be taken to
Group Selection
. You may add new groups or
remove existing groups. If you do not want to change anything, skip to the next
step.
9.
Click on
Next
. The participant list will appear.
You can renumber the remotes in order of any column you click on to order by
going to
Options
(in the
Participant Wizard
window) and selecting
Autonumber
Remotes
.
10.
Make the necessary changes and click on
Finish
when done. The
Save As
window
will appear.