
User's Manual
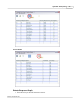
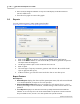
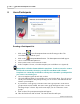
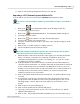
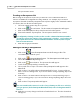
Table Of Contents

Qwizdom Actionpoint User Guide57
Qwizdom Actionpoint 2007
8 Users/Participants
Creating a Participant List
1.
Click on the
Users/Participants button in the floating toolbar. The
Users/Participants
window opens.
2.
Click on the
Participant Wizard
button. The
Participant
wizard will appear.
3.
Select "
Create New Participant List."
4.
Enter a name for the class and click on
Next
.
5.
In the
Template Selection
, select the template you would like to use (optional).
Remote ID is a default column within the templates. You do not need to create a
field for the remote IDs, otherwise you will have two Remote ID columns.
Templates are commonly used fields to allow you to customize a participant list
you create or an existing one.
6.
Select a template (optional) and click on
Next.
7.
Select the different fields you would like to use and click on
Next
. If you do not see
a field you would like in the participant list, you can create a customized field and
add it to your template.
8.
If you want to create groups, enter the name of the group in the "
Create a new
group"
field and click on
Add
. The name of the group will appear in the "
Use the
following Groups
" column. Skip to the next step if you do not want to create
groups.
9.
Click on
Next
. The participant template will appear.
10.
Fill in the fields and click on
Finish
. The
Save As
window will open.