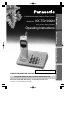
Model No. KX-TG1000N Pulse-or-tone dialing capability Preparation 2.4GHz Multi-Handset Cordless Phone System Operating Instructions Basic Operation Advanced Operation PLEASE READ BEFORE USE AND SAVE. Charge the battery for about 12 hours before initial use. Panasonic World Wide Web address: http://www.panasonic.
Before Initial Use Please read IMPORTANT SAFETY INSTRUCTIONS on page 74 before use. Read and understand all instructions. Thank you for purchasing your new Panasonic cordless telephone. Caller ID and Call Waiting Service, where available, are telephone company services. After subscribing to Caller ID, this phone will display a caller’s name and phone number.
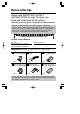
For Best Performance Battery Charge A rechargeable Nickel-Metal Hydride (Ni-MH) battery powers the handset. Charge the battery for about 12 hours before initial use (p. 11). Base Unit Location/Noise Calls are transmitted between the base unit and the handset using wireless radio waves. For maximum distance and noise-free operation, the recommended base unit location is: Away from electrical appliances such as a TV, personal computer or another cordless phone.
Contents Preparation Location of Controls . . . . . . . . . . . . . . . . . . . . . . . . . . . . . . . . . 6 Display . . . . . . . . . . . . . . . . . . . . . . . . . . . . . . . . . . . . . . . . . . . . 9 Settings. . . . . . . . . . . . . . . . . . . . . . . . . . . . . . . . . . . . . . . . . . . . 10 Connections . . . . . . . . . . . . . . . . . . . . . . . . . . . . . . . . . . . . . . . 10 Installing the Battery in the Handset . . . . . . . . . . . . . . . . . . . . . 11 Battery Charge . . . . . . .
Preparation Editing a stored number in the Phonebook . . . . . . . . . . . . . . . . 40 Erasing an Item from the Phonebook . . . . . . . . . . . . . . . . . . . . 41 Intercom . . . . . . . . . . . . . . . . . . . . . . . . . . . . . . . . . . . . . . . . . . . 42 Making Intercom Calls. . . . . . . . . . . . . . . . . . . . . . . . . . . . . . . . 42 Answering Intercom Calls . . . . . . . . . . . . . . . . . . . . . . . . . . . . . 43 Transferring a Call . . . . . . . . . . . . . . . . . . . . . . . . . . .
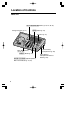
Location of Controls Base unit (LOCATOR/INTERCOM) Button (p. 43, 45, 56, 58) Charge Contacts (p. 12) (HOLD) Button (p. 24) Speaker (p. 24) LC INTE ATOR/ RCOM VOIC MAIL E M1 M2 POWE R M3 HOLD CHAR GE VOLU ME IN US E MUTE TONE FLAS H MIC REDI AL MIC (Microphone) (p. 23, 43) (REDIAL) Button (p. 24) (DIGITALÒSP-PHONE) (Speakerphone) Button and Indicator (p. 23, 25) 6 Spare Battery Compartment (p. 64) Spare Battery Compartment Release Button (p.
Preparation VOICE MAIL Indicator (p. 46) One-Touch Auto Dial Buttons (p. 34) ((M1), (M2), (M3)) POWER Indicator (p. 10, 13, 17) VOLUME (p. 17, 24) , Buttons LC INTE ATOR/ RCOM VOIC MAIL E M1 M2 POWE R M3 HOLD CHAR GE VOLU ME IN US E MUTE TONE FLAS H MIC REDI AL IN USE Indicator (p. 13, 17, 19, 23) CHARGE Indicator (p. 11, 64) (MUTE) Button and Indicator (p. 47) (TONE) Button (p. 47) (FLASH) Button (p.
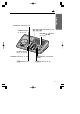
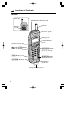
Location of Controls Handset Back side VOICE MAIL Indicator (p. 46) Antenna Speaker (p. 20) Receiver (p. 20) Display (p. 9) Function Buttons (p. 14) Headset Jack (p. 66) (Talk)/(FLASH) Button (p. 19, 25, 46, 47) 1 4 7 (TONE) Button (p. 47) 2 5 8 3 (OFF/CLEAR) Button 6 (p. 14, 22, 44, 59) 9 0 (INTERCOM) Button (p. 42, 44, 57, 59) (SP-PHONE) Button (p. 20) Microphone (p. 20, 25) Charge Contacts (p.
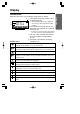
Display Standby mode HANDSET 1 2 NEW CALLS # $ RDL MENU % Preparation While the unit is not in use, the display will be shown as follows. & # The registered handset number (1 to 4) is displayed (p. 54). — The included handset is pre-registered MEM at the factory and assigned the handset number 1. $ The number of new Caller ID calls are displayed if you subscribe to a Caller ID service (p. 26). — If there is no call received or after viewing the calls, new call counter will disappear.
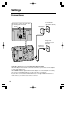
Settings Connections Power Outlet (AC 120 V, 60 Hz) Fasten the cords to prevent them from being disconnected. Hooks AC Adaptor Single-Line Telephone Jack (RJ11C) Telephone Line Cord •USE ONLY WITH Panasonic AC ADAPTOR PQWATG1000N. •The AC adaptor must remain connected at all times. (It is normal for the adaptor to feel warm during use.) •The POWER indicator lights while the AC adaptor is connected (This is normal). •To connect a standard telephone on the same line, see page 67.
Installing the Battery in the Handset Charge Contacts Preparation Install the battery in the handset with the charge contacts facing down and close the handset cover, locking it into place. H Battery Charge Place the handset on the base unit and charge for about 12 hours before initial use. •The CHARGE indicator lights. While charging the battery, the battery icon cycles as shown below.
Settings Battery strength You can check the battery strength on the handset display. The battery strength is as shown in the chart below. Display prompt Battery strength Fully charged Medium Low (flashing) Needs to be recharged. Recharge Recharge the battery when: —“LOW BATTERY” is displayed, or —“ ” flashes on the display. LOW BATTERY RDL MENU MEM Battery information After your Panasonic battery is fully charged (p. 11): Operation Approx.
Selecting the Dialing Mode POWER Indicator Preparation You can program the dialing mode with the base unit. If you have touch tone service, set to “Tone”. If rotary or pulse service is used, set to “Pulse”. Your phone comes from the factory set to “Tone”. Make sure the base unit is in the standby mode initially. (7) IN USE Indicator (*) 1 2 (#) Press (*) three times. •A beep sounds, POWER and IN USE indicators flash quickly on the base unit.
Programmable Functions Programming Guidelines This unit has an advanced design that uses a menu structure and function buttons to access all of the built in features. Function buttons activate instructions that appear above on the display. HANDSET 1 RDL MENU 1 2 MEM How to select a function item from the menu 1. Press ( MENU ) . •The main menu is displayed. 3 4 HANDSET 5 1 6 RDL MENU 7 8 MEM 9 0 2. Scroll through the menu by pressing ) to select the desired item.
Function Menu Table RDL HANDSET 1 MENU : To use the Phonebook (p. 36). (Memory) MEM Press : To view the Redial List (p. 21). (Redial) MEM RDL Preparation You can program the following function items. The display shows the programming instructions. See the corresponding pages for function details. Make sure the handset is in the standby mode initially. ( MENU ) . To view the Caller List (p. 28).
Programmable Functions Selecting the Ringer Volume You can program the desired handset/base unit ringer volume. Make sure the unit is in the standby mode initially. With the handset 5 levels are available. Your phone comes from the factory set to level 2. When set to OFF, the handset will not ring. 1 2 3 4 Press ( MENU ) . ) to select ) or ( Press ( “HANDSET SETTINGS”, and press ( OK ) . CALLS LOG HANDSET SETTINGS RANGE EXTENDER REGISTER ) to select ) or ( Press ( “RINGER VOLUME”, and press ( OK ) .
With the base unit POWER Indicator VOLUME IN USE Indicator (*) 1 2 , Preparation 7 levels are available. Your phone comes from the factory set to level 2. When set to OFF, the base unit will not ring. (#) Press (*) three times. •A beep sounds, POWER and IN USE indicators flash quickly. Press VOLUME Ö or Ñ to select the desired volume. •Each time you press VOLUME Ö or Ñ, the volume will change and ring. •To turn the ringer OFF, press VOLUME Ö repeatedly until no sound is heard. 3 Press (#).
Programmable Functions Selecting the LCD Contrast You can select the LCD contrast level 1 to 16 by programming. Your phone comes from the factory set to level 9. Make sure the handset is in the standby mode initially. 1 2 3 Press ( MENU ) . ) to select ) or ( Press ( “HANDSET SETTINGS”, and press ( OK ) . CALLS LOG HANDSET SETTINGS RANGE EXTENDER REGISTER ) to select ) or ( Press ( “CONTRAST”, and press ( OK ) .
Making Calls With the Handset Back side Speaker Receiver Function Buttons Display (OFF/CLEAR) Basic Operation (SP-PHONE) Microphone 1 Press . 1 PHONE ON VOL 2 Dial a phone number. HOLD MUTE 1 •The dialed number is displayed. 111-2222 VOL 3 To hang up, press (OFF/CLEAR) or place the handset on the base unit. HOLD MUTE PHONE OFF RDL MENU MEM •While the handset is in use, the IN USE indicator on the base unit lights.
Making Calls To have a hands-free phone conversation 1 Press (SP-PHONE). 1 HANDSFREE ON VOL 2 3 4 Dial a phone number. HOLD MUTE 1 •The dialed number is displayed. When the other party answers, talk into the microphone. 111-2222 VOL HOLD MUTE To hang up, press (OFF/CLEAR) or place the handset on the base unit. •“PHONE OFF” is displayed. Hands-free Speakerphone For best performance, please note the following: •Talk alternately with the caller in a quiet room.
To redial the last number dialed on the handset Press ( RDL ) or (SP-PHONE). •The last number dialed is automatically dialed. To redial using the redial list The last 5 numbers dialed with the handset are stored in the redial list. ( RDL ) . Press 3 1-222-333-4444 •The last number dialed is displayed. ) to ) or ( Press ( highlight the desired number. 111-2222 F G SELECT •To exit the list, press (OFF/CLEAR). Press or (SP-PHONE).
Making Calls To put a call on hold Press ( HOLD ) during a conversation. •The DIGITAL SP-PHONE indicator flashes on the base unit. •If a call is kept holding for 5 minutes, a ring back tone will sound and “CALL ON HOLD RING BACK !” will be displayed. If you do not answer the recall within 30 seconds, the call will be disconnected. H RDL CALL ON HOLD MENU MEM To release the hold From the handset, press or (SP-PHONE). From the base unit, press (HOLD) or (DIGITAL!SP-PHONE).
With the Base Unit VOLUME (DIGITALÒSP-PHONE) and Indicator (REDIAL) 1 2 3 4 Basic Operation MIC IN USE Indicator , (HOLD) Press (DIGITAL!SP-PHONE). •The DIGITAL SP-PHONE and IN USE indicators light. Dial a phone number. When the other party answers, talk into the MIC (microphone). To hang up, press (DIGITAL!SP-PHONE). •The indicator lights go out. •If IN USE indicator lights, the handset is engaged in an external call. Wait until the IN USE indicator light goes out.
Making Calls Digital Speakerphone For best performance, please note the following: •Talk alternately with the caller in a quiet room. •If the other party has difficulty hearing you, press VOLUME Ö to decrease the speaker volume. •If the other party’s voice from the speaker cuts in/out during a conversation, press VOLUME Ö to decrease the speaker volume. To adjust the speaker volume (7 levels) while talking To increase, press VOLUME Ñ. To decrease, press VOLUME Ö.
Answering Calls When a call is received, the unit rings, and “INCOMING OUTSIDE CALL” is displayed on the handset. If you subscribe to a Caller ID service, the calling party information will be displayed after the first ring (p. 26). In order to view the Caller ID information, please wait until the second ring to answer a call. With the Handset Press . Basic Operation •You can also answer a call by pressing any dialing button (0) to (9), (*), (#) or (INTERCOM) (—Any Key Talk).
Caller ID Service This unit is compatible with a Caller ID service offered by your telephone company. If you subscribe to a Caller ID service, the calling party’s information will be shown on the handset display after the first ring. The unit can record information of up to 50 different callers in the Caller List. The Caller List information is sorted by the most recent to the oldest call. When the 51st call is received, the first call is deleted. Using the list, you can automatically call back a caller.
•Caller information cannot be displayed in the following cases: •—If the caller dialed from an area which does not provide a Caller ID service, the display will show “OUT OF AREA”. •—If the caller has requested not to display his/her information, the display will show “PRIVATE”. •If your unit is connected to a PBX which does not support Caller ID services, you cannot access those services. •The name display service may not be available in some areas.
Using the Caller List Viewing the Caller List You can view the caller list with the handset. Make sure the handset is in the standby mode initially. 1 2 Press ( MENU ) . ) to select ) or ( Press ( “CALLS LOG”, and press ( OK ) . CALLS LOG HANDSET SETTINGS RANGE EXTENDER REGISTER F 3 To search from the most recent call, ). press ( To search from the oldest call, ).
Ex. When you search from the most recent call: HANDSET 1 2 NEW CALLS RDL MEM MENU ( MENU ) . Press CALLS LOG HANDSET SETTINGS RANGE EXTENDER REGISTER F G OK JACK SMITH 1-222-333-4444 3:10A Jun10 F Press N01 G CID ( ). NANCY BROWN 222-3333 3:15P Jun9 F Press N02 G CID ( ). NANCY BROWN 222-3333 1:54P Jun9 F Press #03 OK ). To return to the previous caller, ). press ( To exit the Caller List, press and hold (OFF/CLEAR). •The handset will return to the standby mode.
Using the Caller List Calling Back from the Caller List 1 2 Press ( MENU ) . ) or Press ( LOG”, and press ) to select “CALLS ( ( OK ) . CALLS LOG HANDSET SETTINGS RANGE EXTENDER REGISTER F 3 ) or ( Press ( the desired caller. ) repeatedly to find JACK SMITH 1-222-333-4444 3:10A Jun10 F 4 Press G OK or (SP-PHONE). N01 G CID PHONE ON VOL HOLD MUTE or HANDSFREE ON VOL •After a few seconds, the displayed phone number is dialed automatically.
Editing the Caller’s Phone Number You can edit a phone number into one of 4 patterns. Make sure the handset is in the standby mode initially. 1 2 Press ( MENU ) . ) or Press ( LOG”, and press ) to select “CALLS ( ( OK ) . CALLS LOG HANDSET SETTINGS RANGE EXTENDER REGISTER F FRED PARKER 1-234-321-5555 11:20A Jan10 #01 F 4 Press ( OPT# ).
Using the Caller List Storing Caller List Information in the Phonebook You can store names and phone numbers that are in the Caller List into the phonebook. Make sure the handset is in the standby mode initially. 1 2 Press ( MENU ) . ) or Press ( LOG”, and press ) to select “CALLS ( OK ). ( CALLS LOG HANDSET SETTINGS RANGE EXTENDER REGISTER F 3 ) repeatedly to find ) or ( Press ( the desired caller, and press ( CID ) . CINDY TURNER 1-234-456-7890 11:20A Jan12 #02 F 4 Press ( SAVE ) .
Erasing Caller List Information After checking the Caller List, you can erase some or all of the entries. Make sure the handset is in the standby mode initially. To erase a specific caller from the Caller List Press ( MENU ) . ) or Press ( LOG”, and press ) to select “CALLS ( ( OK ) . CALLS LOG HANDSET SETTINGS RANGE EXTENDER REGISTER F 3 4 ) repeatedly to find ) or ( Press ( the caller you want to erase from the Caller List, and press ( CID ) . Press ( ).
One-Touch Dialer Storing Phone Numbers in the One-Touch Auto Dial Buttons You can store up to 3 phone numbers in the one-touch auto dial buttons. The stored number is dialed with a one-touch operation. Do not press any one-touch auto dial buttons before storing to prevent misoperation. Make sure the base unit is in the standby mode initially. 1 2 3 Press and hold one of the one-touch auto dial buttons ((M1) to (M3)) until a beep sounds. Enter a phone number, up to 32 digits.
Dialing a Stored Number Press the required one-touch auto dial button ((M1) to (M3)). on •The number is dialed automatically. •Numbers stored in the base unit can only be dialed from the base unit.
Using the Phonebook You can store up to 50 names and phone numbers in the phonebook using the handset. All phonebook items are sorted by the first word in alphabetical order. Using the phonebook, you can make a call by selecting a name on the display. You cannot access numbers stored in another handset or the base unit from a handset. Storing Names and Numbers in the Phonebook Make sure the handset is in the standby mode initially. 1 2 Enter a phone number, up to 32 digits.
Selecting Characters to Enter Names The handset dialing buttons ((0) to (9)), (*) or (#) can be used to enter letters and symbols. The letters are printed on the dialing buttons. Pressing each button selects a character as shown below. Number of times key is pressed ENTER NAME _ CLR Keys 1 2 3 4 5 (1) & ’ , .
Using the Phonebook Finding Items in the Phonebook Make sure the handset is in the standby mode initially. 1 Press ( MEM ) to enter the phonebook list. F 2 . ) ) or ( Press ( repeatedly until the desired item is displayed. Press ( G FIND ). Press ). ( Symbol •All phonebook items are stored in the order shown on the right. Number Alphabet letter To search for a name by initial 1 Press ( MEM ) to enter the phonebook list.
Index table Keys Index Keys Index (1) Other symbols, 1 (7) P, Q, R, S, 7 (2) A, B, C, 2 (8) T, U, V, 8 (3) D, E, F, 3 (9) W, X, Y, Z, 9 (4) G, H, I, 4 (0) 0 (5) J, K, L, 5 (*) R (6) M, N, O, 6 (#) # Dialing from the Phonebook Make sure the unit is in the standby mode initially. 1 Press ( MEM ) to enter the phonebook list. 2 ) repeatedly ) or ( Press ( to find the phonebook item that you want to dial. •To search for the item by initial, see page 38.
Using the Phonebook Editing a stored number in the Phonebook Make sure the handset is in the standby mode initially. 1 Press ( MEM ) to enter the phonebook list. F 2 ) repeatedly ) or ( Press ( to find the phonebook item you want to change. •To search for the item by initial, see page 38. 3 Press ( EDIT ) twice. Edit a number. •To add a number: ( ) to move the cursor on the Press position then enter the number.
Erasing an Item from the Phonebook Make sure the handset is in the standby mode initially. To erase a specific item from the phonebook 1 Press ( MEM ) to enter the phonebook list. F 2 3 ) repeatedly to find ) or ( Press ( the phonebook item you want to erase. •To search for the item by initial, see page 38. Press ( EDIT ) . HELEN 123-456-7890 F 4 ( ). DEL EDIT HELEN 123-456-7890 THIS ( THIS ALL ). •The information is erased. •The display will return to step 2.
Intercom A 2-way intercom is possible between the handset and the base unit. The included handset is assigned the handset number 1. The base unit number is 0. When using more than one handset, see pages 56–57. Display (LOCATOR/INTERCOM) Function Buttons (OFF/CLEAR) (SP-PHONE) (INTERCOM) MIC Making Intercom Calls With the handset 1 Press (INTERCOM). BASE GLOBAL PAGE F 2 Enter (0). OR ) to select ) or ( Press ( “BASE”, and press ( OK ) .
With the base unit 1 Press (LOCATOR/INTERCOM). 2 3 When the other party’s voice is heard, talk into the MIC. •The base unit and handset beep for 20 seconds. •To stop paging, press (LOCATOR/INTERCOM). To end the intercom, press (LOCATOR/INTERCOM). •If the handset user does not answer within 20 seconds, the base unit will automatically stop paging the handset. •Using this feature, you can locate a misplaced handset. Answering Intercom Calls Ex.
Intercom Transferring a Call This feature enables you to transfer a call between the handset and base unit. A call can be transferred with announcement (Announced transfer) or without announcement (Blind transfer). When using more than one handset, see pages 58–60. With the handset Announced transfer: During a call, press and (INTERCOM). 1 2 ( HOLD ) •The call is put on hold. Enter (0). OR ) to ) or ( Press ( select “BASE”, and press ( OK ) .
With the base unit Announced transfer: During a call, press (HOLD) then press (LOCATOR/INTERCOM). 1 2 •The call is put on hold. When the handset user answers the page, you can announce the transfer. •If the handset user does not answer, press (DIGITAL!SP-PHONE) twice. 3 To end intercom, press (DIGITAL!SP-PHONE). •When the handset user presses (INTERCOM), or (SP-PHONE) to answer the call, the transfer is completed. Blind transfer: During a call, press 1 2 (LOCATOR/INTERCOM). •The call is put on hold.
Special Features Voice Mail Service Voice mail service is an electronic on-line answering system offered by your telephone company. After subscribing, the voice mail system can answer calls automatically when your line is busy or if calls are not answered. Callers can leave messages by following the pre-recorded instructions. When voice mail messages are recorded, “MESSAGE WAITING” will be displayed and VOICE MAIL indicators on the handset and base unit will flash.
For Call Waiting Service Users Press /(FLASH) on the handset or (FLASH) on the base unit if you hear a call-waiting tone while talking. •The first call is put on hold and you can answer the second call. •To return to the first caller, press /(FLASH) on the handset or (FLASH) on the base unit again. •The call waiting service cannot be used when a parallel connected telephone is in use. •If this function does not operate properly, consult your telephone company for details.
Other Programmable Settings Selecting the Range Extender Mode This feature allows the unit to improve both the sound quality and range when using in an area with excessive interference or requiring a moderate increase in operating range. Your phone comes from the factory set to AUTO. You can select the range extender to: OFF The range extender is not active. ON The range extender is active and “E” (extender icon) is displayed on the display.
Selecting the Ringer Melody You can select the desired ringer melody of the handset and base unit from #1 to #6. Your phone comes from the factory set to pattern #01. Programming must be carried out separately for the handset and base unit. Make sure that the unit is in the standby mode initially. With the handset 1 2 Press With the base unit ( MENU ) . 1 ) to ) or ( Press ( select “HANDSET SETTINGS”, and press ( OK ) . 2 Press (*) three times.
Other Programmable Settings Setting the Low Battery Tone You can choose whether the handset will sound a low battery tone. Your phone comes from the factory set to ON. Make sure that the handset is in the standby mode initially. 1 2 3 4 Press ( MENU ) . ) to select ) or ( Press ( “HANDSET SETTINGS”, and press ( OK ) . CALLS LOG HANDSET SETTINGS RANGE EXTENDER REGISTER ) to select ) or ( Press ( “LOW BATT TONE”, and press ( OK ) .
Setting the Range Tone When the handset is too far from the base unit, the handset will sound a range warning alarm.You can choose whether the handset will sound a range warning alarm. Your phone comes from the factory set to ON. Make sure that the handset is in the standby mode initially. 1 2 3 ( MENU ) . ) to select ) or ( Press ( “HANDSET SETTINGS”, and press ( OK ) . CALLS LOG HANDSET SETTINGS RANGE EXTENDER REGISTER ) ) or ( Press ( to select “RANGE TONE”, and press ( OK ) .
Other Programmable Settings Setting the Keypad Tones You can choose whether the handset keypad will sound tones. Your phone comes from the factory set to ON. Make sure that the handset is in the standby mode initially. 1 2 3 4 Press ( MENU ) . ) to select ) or ( Press ( “HANDSET SETTINGS”, and press ( OK ) . ) or ( Press ( “KEYPAD TONE”, and press ( OK ) .
For Optional Multi-Handset Users You can register and operate up to 4 handsets at the base unit. + KX-TG1000N Optional Multi-Handsets Important: When using two or more handsets, the following operation features will be different. For details, see pages 56 to 61. —Intercom between the handset and base unit —Intercom between handsets —Transferring external calls —Conference calls •All of the handsets ring when calls are received.
For Optional Multi-Handset Users Registering Optional Handsets Registration is necessary for optional handsets. The included handset is pre-registered at the factory and assigned the handset number 1. Do not try to register the handset number 1. You can register up to 4 handsets at the base unit. Each optional handset will be assigned a number at registration. The assigned number will be used as the handset number (p. 56–61). Only one handset can be registered at a time.
Re-registering the Handset If you re-register the handset to a different base unit of the same model, the previous handset number will be cleared in the re-registered handset. You cannot use it as the handset of the previous base unit. Make sure the unit is in the standby mode initially. If you want to change the registered number of a handset so you can use it as an optional handset for a different base unit of the same model (KX-TG1000N), follow the steps below. 1 2 Press ( MENU ) .
For Optional Multi-Handset Users Making Intercom Calls A 2-way intercom is possible between one of the handsets and base unit or between two handsets. Each number assigned to a handset at registration is the handset number (p. 54). The base unit number is 0. Display (LOCATOR/INTERCOM) Function Buttons (OFF/CLEAR) (SP-PHONE) (INTERCOM) MIC (DIGITAL!SP-PHONE) With the base unit 1 Press (LOCATOR/INTERCOM). Then enter the desired handset number ((1) to (4)) within 3 seconds.
With the handset 1 Press (INTERCOM). BASE HANDSET 1 HANDSET 2 HANDSET 4 GLOBAL PAGE F 2 OK G To page another handset or base unit: Ex. Handset 3 paging Handset 1 Enter the desired unit number ((0) to (4)). OR ) to select the desired ) or ( Press ( unit number, and press ( OK ) . Ex. Paging all units To page all units: Enter (*). OR ) to select “GLOBAL ) or ( Press ( PAGE”, and press ( OK ) . CALLING HANDSET 1 PERFORMING GLOBAL PAGE •To stop paging, press (OFF/CLEAR).
For Optional Multi-Handset Users Transferring a Call You can transfer an external call between the base unit and a handset, or between two handsets. A call can be transferred with announcement (Announced transfer) or without announcement (Blind transfer). With the base unit Announced transfer: During a call, press (HOLD) and (LOCATOR/INTERCOM). Then enter the desired handset number ((1) to (4)) within 3 seconds. 1 To page all handsets: Press (HOLD) and (LOCATOR/INTERCOM). •The call is put on hold.
With the handset Announced transfer: During a call, press and (INTERCOM). 1 2 ( HOLD ) •The call is put on hold. To page the base unit: See page 44. To page another handset: Enter the desired handset number ((1) to (4)). OR ) to ) or ( Press ( select the desired handset number, and press ( OK ) . •“PERFORMING GLOBAL PAGE” is displayed on the paging handset. 1 2 To transfer to another handset or base unit: Enter the desired unit number ((0) to (4)).
For Optional Multi-Handset Users Answering a transferred call with the handset Announced transfer: When the paged handset(s) ring(s) and the display(s) show(s) the following, press (INTERCOM), or (SP-PHONE) to answer the page. After the paging party hangs up, you can talk to the outside caller by pressing or (SP-PHONE).
Conference While you are talking with an outside caller, up to 2 other parties can join the conversation. Ex. 1 While the base unit is engaged on an external call, up to 2 handset users can join the conversation. Ex. 2 While a handset is engaged on an external call, up to 2 units (a handset and base unit) can join the conversation. To join a conversation; Using the handset, press or (SP-PHONE). OR Using the base unit, press (DIGITAL!SP-PHONE).
Wall Mounting This unit can be mounted on a wall phone plate. 1 Connect the AC adaptor. To Power Outlet 2 62 #Fit the tabs on the wall mounting adaptor into the holes on the base unit. $Push them in the direction of the arrow.
3 Connect the telephone line cord. Mount the unit, then slide down. 4 To charge the handset battery: Place the handset on the base unit as shown. •The CHARGE indicator lights.
Optional Spare Battery An optional spare battery works as emergency power during a power failure. The fully charged spare battery provides the base unit to receive calls from the handset for up to 5 hours. Moreover, when the handset battery needs charging, replace it with the fully charged spare battery. This eliminates having to wait for the handset battery recharge. Please purchase the Panasonic PQWBTG1000N battery and install it in the Spare Battery Compartment in the base unit to charge.
Replacing the handset battery with the spare battery Note A: Handset battery (discharged battery) B: Spare battery (fully charged battery) 1 Remove the handset cover, then remove the battery. A H 2 Replace the handset battery with the spare battery in the base unit. #Remove the spare battery. $Insert the handset battery in the compartment with the charge contacts facing up. Charge Contacts A B Install the spare battery in the handset with the charge contacts facing down.
Using the Belt Clip You can hang the handset on your belt or pocket using the belt clip. To attach the belt clip To remove the belt clip Using an Optional Headset Plugging an optional headset into the handset allows a hands-free phone conversation. Please use only the Panasonic KX-TCA88 headset. To order call the accessories telephone number on page 2. Connecting the headset to the handset Open the headset jack cover, and connect the headset to the headset jack as shown.
Adding Another Phone If the optional spare battery has been discharged during a power failure, the unit will not work. If required, you can connect a standard telephone on the same line, use the Panasonic T-adaptor KX-J66. To order, call the accessories telephone number on page 2.
If the Following Appear… If the unit detects a problem, one of the following messages will be displayed on the display. The battery needs to be charged. Place the handset on the base unit to charge the battery (p. 11). LOW BATTERY RDL MENU MEM You are too far from the base unit. Move closer and try again. If “SEARCHING FOR BASE” is still displayed, place the handset on the base unit and unplug the AC adaptor to reset. Plug in, and try again.
The redial list is empty. REDIAL LIST IS EMPTY RDL MENU MEM 0 LINE IN USE RDL RDL MEM MENU EXTENSION IN USE MENU The display will be shown when a parallel connected telephone is engaged in an external call. MEM (INTERCOM) was pressed while you are in the 01 THIS IS NOT AN EXTERNAL CALL VOL HOLD MENU intercom mode. You cannot transfer the intercom call. MUTE PHONEBOOK IS FULL Pause The display will be shown when the unit is engaged in an external call. (Ex.
Before Requesting Help 70 Problem Remedy “SEARCHING FOR BASE” is displayed and an alarm tone sounds. •You are too far from the base unit. Move closer and try again. •Place the handset on the base unit and unplug the AC adaptor to reset. Plug in, and try again. •Re-install the handset battery and place the handset on the base unit (p. 11, 65). Try again. The unit does not work. •Check the settings (p. 10–13). •Charge the handset battery fully (p. 11). •Clean the charge contacts and charge again (p.
Problem Remedy The base unit does not ring. •The ringer volume is set to OFF. Select the desired volume level (p. 17). The handset display is blank. •Charge the battery fully (p. 11). You cannot program function •Do not pause for over 10 seconds while items, such as the programming. “HANDSET SETTINGS”. •Move closer to the base unit. Previously programmed information is erased. •If a power failure occurs, programmed information may be erased. Reprogram if necessary.
Before Requesting Help Problem Remedy You cannot page a handset or base unit. •The handset is too far from the base unit. •If the handset or base unit is engaged in an internal/external call, you may not be able to page. Try again later. •The handset has not been registered. Register the handset (p. 54). •The handset has been re-registered to a different base unit of the same model. You cannot redial by pressing ( RDL ) or (REDIAL).
Problem Remedy You cannot have a conversation using the headset. •Make sure that the headset is connected properly (p. 66). If you cannot solve your problem. •Call our customer call center at 1-800-211-PANA(7262). •Panasonic’s e-mail address for customer inquiries: consumerproducts@panasonic.
Important Safety Instructions When using this unit, basic safety precautions should always be followed to reduce the risk of fire, electric shock, or personal injury. 11. Read and understand all instructions. 12. Follow all warnings and instructions marked on this unit. 13. Unplug this unit from AC outlets before cleaning. Do not use liquid or aerosol cleaners. Use a damp cloth for cleaning. 14. Do not use this unit near water, for example, near a bathtub, washbowl, kitchen sink, or the like. 15.
CAUTION: To reduce the risk of fire or injury to persons, read and follow these instructions. 1. Use only the battery(ies) specified. 2. Do not dispose of the battery(ies) in a fire. They may explode. Check with local waste management codes for special disposal instructions. 3. Do not open or mutilate the battery(ies). Released electrolyte is corrosive and may cause burns or injury to the eyes or skin. The electrolyte may be toxic if swallowed. 4.
FCC and Other Information If requested by the telephone company, inform them as follows: FCC Registration No. . . . . . . . . . . . . . . . . . . . . . (found on the bottom of the unit) Ringer Equivalence . . . . . . . . . . . . . . . . . . . . . . . . . . . . . . . . . . . . . . . . . . . . 0.1B The particular telephone line to which the equipment is connected. This unit must not be connected to a coin operated line. If you are on a party line, check with your local telephone company.
Note: This equipment has been tested and found to comply with the limits for a Class B digital device, pursuant to Part 15 of the FCC Rules. These limits are designed to provide reasonable protection against harmful interference in a residential installation. This equipment generates, uses, and can radiate radio frequency energy and, if not installed and used in accordance with the instructions, may cause harmful interference to radio communications.
For product service •Panasonic Servicenters are listed in the servicenter phonebook. •Call 1-800-211-PANA(7262) for the location of an authorized servicenter. •Panasonic’s e-mail address for customer inquiries: consumerproducts@panasonic.com for customers in the USA or Puerto Rico ONLY When you ship the product •Carefully pack your unit, preferably in the original carton. •Attach a letter, detailing the symptom, to the outside of the carton.
Panasonic Consumer Electronics Company, Division of Matsushita Electric Corporation of America One Panasonic Way, Secaucus, New Jersey 07094 Panasonic Sales Company, Division of Matsushita Electric of Puerto Rico, Inc. Ave. 65 de Infantería, Km. 9.