
Installation Sheet

2of2
TRA1716PK
FINISH: POLISHED NICKEL
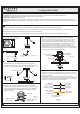
Figure 5
STEP 5 Install the Fixture-
A. Carefully tuck all wires into the outlet box and position the Fixture
Canopy over the outlet box. Align the holes in the ceiling canopy
with the mounting screws, then attach the Fixture Canopy using the
previously removed mounting balls. Hand tighten until snug.
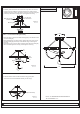
STEP 7 Install the Bulb-
A. Insert the bulb onto the socket and screw snugly into place.
Your fixture is now assembled and ready to use. Enjoy!
NOTE: ALL DIMENSIONS ARE ROUNDED UP
TO THE NEAREST 1/4"
Figure 7
2018 QuoizelInc.
visit us on-line at www.quoizel.com
Mounting Screw
Hex Nut and
Lock Washer
Mounting Ball
A
Fixture Canopy
STEP 6 Install the Bead String Assembly-
a. Place the loop on the end of all Bead Strings (D) to the bottom hooks
on fixture body (B).
b. Place bead strings one next another. Attach the hook on the end of
the Bead String (D) to the loop at the bottom edge of the support
Ring (C).
c. Place the cap (F) over the nipple extruding from the fixture body (B).
Secure with the glass accent (E). Hand-tighten until snug.
Bulb(not included)
5” Dia.
14.5”
16”
ReleasedDate:2018-11-05
Loop
D
E
Hook
Hook
Loop
B
C
F
Nipple
Figure 6