
Installation Sheet


2of2
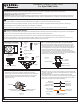
STEP 4 Install the Fixture-
A. Carefully tuck all wires into the outlet box and position the ceiling
canopy over the outlet box. Align the holes in the ceiling canopy
with the mounting screws, then attach the ceiling canopy using the
previously removed mounting balls. Hand tighten until snug.
Bulb (not included)
Figure 5
TFMK1714VA
NOTE: ALL DIMENSIONS ARE ROUNDED UP TO THE NEAREST 1/4"
FINISH: VALIANT BRONZE
2018 QuoizelInc.
visit us on-line at www.quoizel.com
STEP 5 - Install Shades and Bulbs
A. Thread the hex nut end of the Nipple with Hex Nut (E) into the hex
coupling on the bottom center of the Socket Assembly (B). By
using pliers, thread the hex nut against the hex coupling and hand
tighten until snug.
B. Place the Spacer Tube (C) and the Check Ring (D) over the bottom
end of the Nipple (E) and secure with the Small Knurled Nut (F).
Hand tighten until snug.
C. Thread the Big Knurled Nut (G) onto the end of the Nipple (E) and
adjust it to proper location for rest components.
D. Place the Flat Washer (H) and the Shade (J) over the bottom end
of the Nipple (E) and secure with the Finial (I). Hand tighten until
snug.
E. Insert bulbs onto sockets and screw snugly into place.
Your fixture is now assembled and ready to use. Enjoy!
C
Socket
Mounting Screw
Mounting Ball
A
Figure 4
Ceiling Canopy
E
D
G
I
H
F
Hex coupling
14.5” SQ.
5.5”
ReleasedDate:2018-08-07
J
B
6” SQ.
7.75”