
Installation Sheet

Supply Wires
and Ground Wire
2of2
2019 QuoizelInc.
visit us on-line at www.quoizel.com
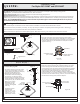
STEP 4A - Wire Connections
A.
B. Use standard wire connectors (not included) to make all wire
connections. Twist connectors until wires are tightly joined together.
Wrap each connection with approved electrical tape and carefully
stuff all the connected wires into the Outlet Box.
Wrap bare or green ground wire around green ground screw on the
crossbar, no less than 2 inches from the end of the wire. Tighten the
green ground screw.
Green Ground Screw
on the Crossbar
White wire
from outlet box
White wire
from fixture
Black wire from
outlet box (or Red)
Black wire
from fixture
Bare, or Green
Ground wire
from outlet box
Ground wire
from Fixture
STEP 5A Install the Fixture-
A. Carefully tuck all wires into the outlet box and position the Fixture
Canopy over the outlet box. Align the holes in the ceiling canopy
with the mounting screws, then attach the Fixture Canopy using the
previously removed mounting balls. Hand tighten until snug.
ReleasedDate:2019-04-04
Figure 4A
Mounting Screw
Mounting Ball
A
Fixture Canopy
Figure 5A
STEP 6A - Install the Bulbs
A. Insert bulbs onto sockets and screw snugly into place.
Your fixture is now assembled and ready to use. Enjoy!
Vintage Bulb
(recommended
but not included)
Socket
Figure 6A
Assembly Instructions for Semi-Flush Light: QF5124WT
(Step 1B)
(Extra Parts include)
The following parts will not be used in the assembly of the Semi-
Flush Light fixture. Please set aside these parts.
6” Rod
x2
B
C
12” Rod
x2
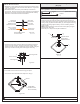
STEP 1B Install Ceiling Canopy to Socket Assembly
NOTE
-
A. Pass the supply wires with the ground wire through the swivel (if
used) and the ceiling canopy (D). Thread the swivel (if used) and the
ceiling canopy (D) onto the Fixture Body (F). Hand tighten until snug.
Cut the wires leaving approximately 6” of wire extending from the
ceiling canopy.
: Always tighten the set screw on the swivel (D) by using the
Allen Wrench (G) if used.
B. Go to Step 2A Step 6A to complete installations.-
F
Optional Swivel
D
Set Screw
G
Figure 1B