
Installation Sheet

2of2
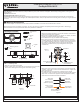
STEP 4 - Attach Fixture Body to Crossbar
A. F .
Line up the holes on the side of the eiling anopy to the mounting
holes on the (A). Secure them with Mounting
Screws (B). Tighten until sung.
it excess cord and electrical wires in the ceiling canopy properly
cc
Crossbar Assembly
Your fixture is now assembled and ready to use. Enjoy!
Figure 4
Ceiling
Canopy
A
B
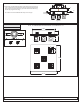
PCHL1611C
FINISH: POLISHED CHROME
NOTE: ALL DIMENSIONS ARE ROUNDED UP TO THE NEAREST 1/4"
10.75”
2”
9” SQ.
GND
2.4mm
13 Ga13 Ga
4.25”
2”
2”
10.75”
2018 QuoizelInc.
ReleasedDate:2018-04-13
visit us on-line at www.quoizel.com