
Installation Sheet

2of2
2017 QuoizelInc.
Thank you for purchasing a Quoizel product.
Need assistance with parts or assembly? Call Quoizel customer service at 1-800-645-3184
or visit us on-line at www.quoizel.com
ReleasedDate:2017-04-17
CAUTION FOR BULB REPLACING
A. When replace bulb, turn off power and allow lamp to cool. For safety
purpose, wear gloves and eye protection.
B. If bulb is scratched or cracked, DO NOT use the lamp to avoid
breakage during use or installation.
C. Use only in fixtures rated for lamps wattage and voltage.
D. Prevent the bulb from contacting liquid or combustible materials.
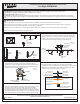
STEP 4 Install the Fixture-
A. Remove Protective Film from Ceiling Canopy. Position the ceiling
canopy and Fixture Body (B) onto the Crossbar Assembly (A). Place
the holes in the ceiling canopy over the mounting screws. Secure
the Fixture Body (B) by using the mounting balls and hand tighten
the mounting balls until snug.
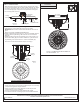
STEP 5 Install Bulbs and Crystal Strings
IMPORTANT:
-
A. Insert bulbs (C) into sockets and push snugly into place.
Do not touch the bulb with bare hands use a cloth or
glove.
(Refer to CRYSTAL STRINGS DISTRIBUTION)
B. Attach Crystal Strings A to locations “A” on the Fixture Body (B) first.
And then attach Crystal Strings B to locations “B” on the Fixture
Body (B).
C. Attach the beads end of the Crystal Strings C to inner locations “C”
on the Fixture Body (B) first. And then attach the crystal end of the
Crystal String C to outer locations “C” on the Fixture Body (B).
Your fixture is now assembled and ready to use. Enjoy!
Crystal
String A
Crystal
String B
Crystal
String C
C
Socket
CRYSTAL STRINGS DISTRIBUTIONS
A
A
A
B
B
B
B
B
B
B
B
C
C
C
C
C
C
C
C
C
C
C
C
C
C
C
C
C
C
C
C
C
C
C
C
C
C
C
C
C
C
C
C
C
C
C
C
C
C
C
C
C
C
C
C
C
C
C
C
Figure 5
PCGN1616C
FINISH: POLISHED CHROME
NOTE: ALL DIMENSIONS ARE ROUNDED UP
TO THE NEAREST 1/4"
15.75” Dia.
13.75” Dia.
8.75”
Figure 4
Mounting
Screw
Mounting Ball
A
B
Ceiling
Canopy
Protective Film