
Installation Sheet

2of2
2019 QuoizelInc.
ReleasedDate:2019-01-22
visit us on-line at www.quoizel.com
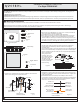
STEP 4 Install the Fixture Body-
A. Thread Mounting Screws (B) into mounting holes on the side of the
Inner Backplate (A). Do not thread all screws in.
B. Carefully tuck all wires into the outlet box. Fit the slots on the
ceiling canopy with the Mounting Screws (B) and push the ceiling
canopy until it is hung safety on Mounting Screws (B).
C. By using screwdrivers, tighten Mounting Screws (B) until snug to
secure the ceiling canopy.
Figure 4
A
F
B
Slot
Ceiling
Canopy
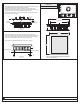
STEP 5 Install the Diffuser-
A. Place the Diffuser (G) onto the Fixture Body (F) with the print
screen side against the crystals. Place the Rubber Washer (H) onto
the Lock Screw (I) and thread the Lock Screw (I) onto the support
rod to secure the Diffuser (G). Hand tighten until snug.
Your fixture is now assembled and ready to use. Enjoy!
Figure 5
F
G
H
I
Print Screen
Support Rod
PCBK1614C
FINISH: POLISHED CHROME
G
N
D
13.75” SQ.
11.75” SQ.
12.5”
4”
NOTE: ALL DIMENSIONS ARE ROUNDED UP
TO THE NEAREST 1/4"
12.5”