
Installation Guide
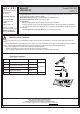


Outlet Box
Lock Ball
Hex Nut and Lock Washer
Crossbar
Ceiling Canopy
3
2015 QuoizelInc.
Nov.2015
Crossbar Assembly
Outlet Box Screw
STEP 1:
a. Secure the crossbar to the outlet box (not included) with
outlet box screws.
b. Tighten until snug.
The preassembled mounting nipple on the
crossbar should protrude outward.
NOTE:
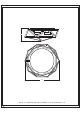
Outlet Box
STEP 2:
a. Remove lock ball from crossbar assembly.
b. Fit ceiling canopy of fixture body over the nipple on
crossbar assembly and secure with lock ball.
The ceiling canopy should be snug against the
ceiling and the lock ball.
If not, adjust the length of the nipple on the crossbar
assembly by unscrewing the preassembled hex nuts.
Then, screw the nipple in or out of the crossbar until the
desired length is achieved.
Once the ceiling canopy is secure, remove the lock ball
and ceiling canopy and proceed to Step 3.
Note:
?
?
?
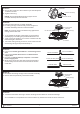
WHITE OR RIBBED
BLACK (OR RED) WIRE
GROUND WIRE
WHITE OR RIBBED
BLACK OR SMOOTH
GROUND WIRE
FROM HOUSE
FROM HOUSE
FROM HOUSE
FROM FIXTURE
FROM FIXTURE
FROM FIXTURE
STEP 3:
a. Connect the to the
.
b. Connect the to the
.
c. Connect the to the
.
d. Wrap each connection with approved electrical tape
and carefully stuff all of the connected wires into the
outlet box.
house ground wire fixture ground
wire
house white wire white fixture
supply wire
house black (or red) wire black
fixture supply wire
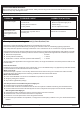
STEP 4:
a. Re-attach the ceiling canopy to the crossbar assembly.
b. Secure with the previously removed lock ball.
Outlet Box
Lock Ball
Crossbar
Ceiling Canopy
STEP 5:
a. Install correct bulbs referring to fixture markings and/or labels for maximum wattage.
Your installation is completed now. Restore electricity. Retain this sheet for future reference.