
Installation Guide


16
QUIETCOOLSYSTEMS.COM
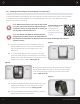
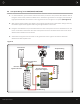
5. Begin wiring the fan by opening up the handy box. Take off the wire nuts within the handy box.
Unscrew the green ground wire from the handy box. Detach the green ground wire from the power
cord. Remove the power cord. Re-attach the ground screw and wire to the handy box. Cut your
green ground wire in half and strip both sides. (see Figure D)
6. Feed the 2 wire Romex into the handy box. Using the included wire nuts, tie the black wires together
for high speed. Tie the red wires together for low speed. Tie the remaining white neutral wires
together. Tie your bare copper wires and green ground wires together.
7. Carefully reinstall the handy box cover.
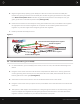
4-3 Two Motorhead Wiring (for CL-6400)
1. For this installation, you will need (3) 2 wire Romex, an 8 Hour Timer, and a Double Stack Single Pole
Switch.
2. Using the 2-wire Romex from the first fan motor head, attach the black wire to the top gold screw
on the right. Using the 2-wire Romex from the second fan motor head, attach the black wire to the
bottom gold screw on the right. (see Figure E)
3. Attach the red wire from the 8 Hour Timer to the bottom black screw on the switch.
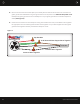
4. Using the 2 wire Romex from your power source, tie the black wire to the black wire on the timer with
a wire nut.
5. Take a piece of bare copper wire and attach it to the green ground screw on the switch. Using a wire
nut, tie all copper wires together with the green ground wire from the timer. Tie all the white wires
together. Finish the installation of your switches and switch cover plate.
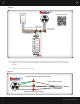
Tie All Ground & Bare Copper Wires Together
Red Wires Together
All Black Wires Together
Common Wires Together
Whole House Fan
14-3 Wire
Tie All Ground & Bare Copper Wires Together
Red Wires Together
All Black Wires Together
Common Wires Together
Whole House Fan
14-3 Wire
Figure D