
Owners Manual


1-888-QUIETCOOL
17
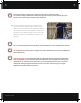
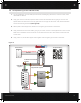
10. Tie the three remaining black wires together. Tie the three remaining white common wires together.
Tie the three bare copper wires and the two green ground wires together.
11. Carefully reinstall the handy box cover.
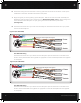
4-3 Three Speed Wiring (for STL PRO 4.8X, 5.5X, 6.0X & 7.0X)
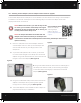
1. For this installation, you will need (2) 2 wire Romex and (1) 3 wire Romex, a black jumper wire, double-
gang retrofit box, an 8 Hour Timer, and a Double 3-Way Combination Switch. Begin by taking the
jumper wire, and attach it to the top gold screw on the right and the bottom black screw on the left of
the switch. (see Figure F on page 18)
NOTE: With a pair of needle nose pliers, break the bus on the switch. The bus is located on
the left between the two black screws. With a little finesse it is very simple to remove.
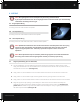
2. From the 3 wire Romex, attach the black wire to the 2nd gold screw on the right. Attach the white wire
to the 3rd gold screw, which should be identified with tape and will be used to power medium speed.
Attach the red wire to the 4th gold screw. With a piece of bare copper wire, attach it to the green
ground screw on the switch.
4. Using one of the supplied wire nuts, tie the black wire from the 2 wire Romex to the black wire on the
timer. Tie the white wire from the 2 wire Romex to the white wire on the timer.
5. Using a wire nut, tie all bare copper wires together with the green ground wire on the timer.
6. Attach the red leg wire from the timer to the first black screw on the switch. Finish up the installation
of the timer and switch and switch cover plate.
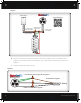
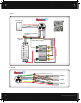
7. Begin wiring the fan by opening up the handy box. Take off the wire nuts within the handy box. Detach
the green ground wire from the power cord. Remove the power cord. Re-attach the ground screw
and wire to the handy box. Cut your green ground wire in half and strip both sides. (see Figure G on
page 18)
8. Feed the 3 wire Romex into the handy box. Tie the blue & black wire together for high speed. Tie the
yellow and white taped wire together for medium speed. Tie the red wires together for low speed.
9. Feed the 2 wire Romex from your timer into the handy box. Feed the 2 wire Romex from your power
source into the handy box.
10. Tie your three remaining black wires together. Tie your three remaining white common wires
together. Tie the three bare copper wires and the two green ground wires together.
11. Carefully reinstall the handy box cover.