
Instructions / Assembly

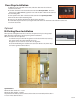

Door Stop Installation
1. With the straps installed on the door, slide the door onto the rail that is
installed on the wall.
2. Position the door in the desired location for the closed position. Place the
door stop (p/n QG.FR40.08) against the rail and the door. Mark the location of
the mounting hole.
3. Now position the door in the desired location for the opened position.
Mark the location of the mounting hole.
4. Using a 5/16” drill bit drill the holes for the door stop bolts.
5. Install door stops onto the rail, using the bolt and washer on the front side and lock washer and
nut on the back side.
Optional
Bi-Parting Door Installation
Two separate rolling Barn Door kits as well as the optional rail splice kit (p/n QG.
FR41.08) will be required for most bi-parting door installations.
When 2 or more rails are required:
1. Slide the rail splice kit into the grooves on the back of the rail, locating
the center of the splice kit between the 2 rails.
2. Tighten the set screws to secure the rails together.
3. Continue following the installation instructions for the rails, door stops
and center-guides outlined above.
Speci cations:
Maximum door thickness = 1-3/4”
Maximum door weight = 250 lbs
Gap between the wall (or surface where the brackets are mounted) and the door =
1-15/16” minus door thickness
9/9/14
QG.FR41.08