
Product Manual

Plow Cart
® patent pending
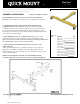
Remove snow plows faster and easier using the Quick Mount
Plow Cart by All-Type Welding and Fabrication, Inc.
FITS HINIKER TYPE PLOWS
USER INSTRUCTIONS FOR QUICK MOUNT PLOW CART
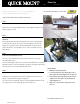
STEP 1
Pre-load Plow to mount on Quick Mount Plow Cart.
Attach plow to truck using Hiniker Quick-Hitch 3 step procedure. Straighten plow blade so side
hydraulic cylinders are equal.
STEP 2
Adjust Quick Mount Plow Cart to specific Plow Manufacturer's Framework.
Before rolling the Quick Mount Plow Cart under the plows A-frame, bolt the adjustable foot plate to
the cart, using the (2) 5/16'' bolts, fasten the adjustable foot plate to the Support Tube using
using the two (2) holes closest to the end of the frame. Set the distance so the plow blade is close
to center or towards the rear of the Blade Channel.
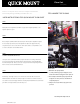
STEP 3
Load Plow onto Quick Mount Plow Cart
Lower plow onto the Quick Mount Plow Cart, using the instructions for removing a Hiniker Plow,
disconnect electrical plugs. Pull stand pin and lower stand until it makes contact with Adjustable
Foot Plate and replace pin. Release lever lock to release plow from forks and pull away from truck.
Plow is now stored on the Quick Mount Plow Cart.
SAFETY NOTES
STEP 4 1. Maximum Load Capacity 1080 lbs.
Install Plow on Truck from Quick Mount Plow Cart 2. To avoid possible injury, keep all body parts clear of
blade channel when releasing plow onto the plow cart.
Roll Plow up to truck. Align receivers to forks. Push into mount. Position with one hand on the 3. Never attempt to lift A-frame up beyond jack max. lift
Mold Board and the other hand on the Pump Housing Cover. Pull lever to lock Plow to truck and height, this can cause plow to become unbalanced
raise stand. Connect electrical plugs. Lift Plow off cart and pull Quick Mount Plow Cart out from under and possibly flip over.
plow. Plow is now easily installed to truck and ready for use. 4. Always lock rear caster when storing a plow on the
plow cart.
web: www.quickmountplowcart.com
QUICK MOUNT
QMB-CH Hiniker - 09/02