
Installation & Assembly


Preparing the room
− Check that the doors can still open and close after the floor and underlayment have been installed (minimum +1cm (3/8”)).
− Check whether the old molding can be removed. You can also leave the wall base and finish the floor with Quick•Step® profiles.
− Make sure the subfloor is flat. Any unevenness greater than 2mm (1/16”) over the length of 1 meter (40”) must be smoothed out.
It is vital that you use an underlayment to smooth any unevenness in the base floor. The specially designed Quick•Step® under-
layments have a damp-proof, insulating, noise-reducing and levelling function. The smooth top surface makes installing the floor
panels easier and ensures ample expansion afterwards. You can find more information about Quick•Step® underlayments and
how to install them on the underlayment packaging or at your dealer.
− Make sure the subfloor is clean and dry.
CONCRETE SUBFLOOR:
New Construction:
− A new concrete floor must dry at least 1 week per 1cm (3/8”) thickness up to 4cm (1-1/2"). Subfloors thicker than 4cm (1-1/2")
require twice as much drying time. For example, a 6cm (2-1/2") concrete subfloor must dry for at least 8 weeks. The moisture
content must be less than 2.5% (CM method) or less than 5 lbs/24 hours per 1000sqft (Calcium chloride method ASTM 1869).
− If there is underfloor heating, the subfloor must not exceed 28.8°C (84°F) and the moisture content must be less than 1.5% (CM
method). You do need to follow special installation instructions. Please ask your dealer for more information.
Renovation:
− Remove any damp-porous floor covering (carpet, needle felt, etc.) first.
− Damp-sealed floor covering (PVC, linoleum, VCT, etc.) does not have to be removed. Always use underlayment. We recommend
using Quick•Step® underlayment.
WOODEN SUBFLOOR
− Remove any existing damp—porous floor covering first.
− Make sure the subfloor is stable. Nail down any loose parts and apply a levelling layer (Quick•Step® Softboard, for example) if
necessary.
− Install the Uniclic® panels crosswise to the direction of the existing subfloor.
− It is necessary that the crawl space under the plank floor be sufficiently ventilated. Remove any obstacles and provide sufficient
ventilation (minimum 4cm (1-1/2") of total ventilation holes per meter (40”) of floor). The moisture content of the wood may not
exceed 12%.
Installing the floor
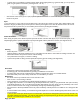
− First install the underlayment, per width and gradually as you progress. If the underlayment is pre-mounted on the panels, then
only use the damp-proof moisture barrier with adhesive tape as provided. For Concrete, let the moisture barrier run up the wall a
bit before cutting to size. A molding will be attached to this later. For wood, cut the moisture barrier 1 inch from the wall. (See
diagram 3A.)
− Begin the first row with a whole plank. First saw off the tongue on both the long and the short sides. (See diagram 3B.)
− Put the plank with the sawn off sides against the walls. Put spacers from the installation kit between the planks and the wall. This
will ensure that your expansion joint is wide enough: 8 to 10mm (5/16" to 3/8”). (See diagram 3C.)