
Installation & Assembly

Quick
•
Step
®
NatureTEK
™
Installation Instructions
0328_May/2019
Page 2 of 5
INSTALLATION INSTRUCTIONS
expansion joint is required in doorways less than 32-inches (0,81m) or if the installation changes direction through the
doorway (regardless of doorway size). Expansion joints can be finished by means of a molding that is attached to the
subfloor.
9. Ensure that the end joints of the planks in two successive rows are never in line. Always ensure that the joints are
staggered by at least 6 inches.
10. We recommend you purchase extra cartons in case you have some damaged pieces, miscalculate the room size, cut any
pieces incorrectly or need replacement planks for future repairs.
PREPARING THE ROOM
• Mix planks from different cartons when installing to maximize the natural look of the floor.
• Check that the doors can still open and close after the floor has been installed (minimum 3/8-inch).
• Check whether the existing molding can be removed. You can also leave the wall base and finish the floor with accessory
profiles.
• Make sure the subfloor is flat. Any unevenness greater than 1/16-inch over the length of 40 inches must be smoothed out.
• Make sure the subfloor is clean, dry and stable.
• Flooring may be installed over radiant heat systems following special installation instructions. Contact your retailer for
further details.
CONCRETE SUBFLOOR
The moisture content of the concrete must be less than 5 lb/24 hr per 1000 sq ft (ASTM F1869) or <80% RH with an in situ
probe (ASTM F2170). Always use underlayment and a minimum 6-mil poly moisture barrier if a moisture barrier is not attached
to the underlayment.
New Construction:
• A new concrete floor must dry at least 1 week per 3/8-inch thickness up to 1-1/2 inches. Thicknesses over 1-1/2 inches
require twice as much drying time. For example, a 2-1/2-inch concrete subfloor must dry for at least 8 weeks.
• Renovation:
• Remove any damp-porous floor covering (carpet, needle felt, etc.) first.
• Damp-sealed floor covering (PVC, linoleum, VCT, etc.) does not have to be removed.
WOODEN SUBFLOOR
• Remove any existing damp-porous floor covering first.
• Make sure the sub floor is stable. Nail down any loose areas and apply a leveling layer if necessary.
• Install the Uniclic® planks crosswise to the direction of the existing subfloor.
• For installations over a crawl space, the soil in the crawl space must be covered by a 6-mil non-recycled polyethylene
film with seams overlapping at least 8 inches. In addition, vents should be located throughout the foundation. They must
provide good cross ventilation and no dead air space. There must be minimum vent openings equal to 1.5% of the square
footage within the crawl space. For example, 100 sq ft of crawl space must have at least 1.5 sq ft of open vents.
• The moisture content of the wood may not exceed 12%.
INSTALLING THE FLOOR
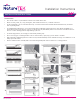
• First install the underlayment. See Diagram 3A. If the underlayment is pre-mounted on the planks, use a damp-proof
moisture barrier with water resistant adhesive tape. For concrete, let the moisture barrier run up the wall before cutting to
size. A molding will be attached to this later. For wood, cut the moisture barrier 1 inch from the wall.
• Begin the first row with a whole plank. First saw off the tongue on both the long and the short sides. See Diagram 3B.