
Installation Manual


BI 7.2.3-40 May-2016, Rev 1
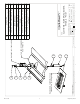
Gather materials needed.
2
3
1
Waterproofi ng on Tile: Three-Course Method
Apply a bead of sealant in the shape of an upside
down U on the back side of the base mount around
the lag holes. Bottom of U should point towards roof
ridge
Install the base mount. Clean away dust and debris.
(See instructions on pg 1)
5
6
4
Apply " thick layer of roofing cement around the
top and sides of the sub-flashing with at least 2"
extending past the sides of the flashing onto the felt.
While cement is still wet apply 3 pieces of roof repair
fabric strips where felt paper and flashing meet – a
16" strip along the top, and a 9" strip along each
side.
Installation Tools Required: gloves, hammer, brush, roofing cement, trowel, 4 inch wide roof repair fabric.
A er first layer of cement is dry, apply second layer
over fabric to finish waterproofing of sub-flashing.
2
WARNING: Quick Mount PV products are NOT designed and should NOT be used for anchoring fall protection equipment.