
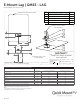
Specifications Sheet
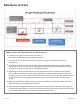


1st course
3rd course
2nd course
You are now ready for the rack of your
choice. Follow all the directions of
the rack manufacturer as well as the
module manufacturer.
All roo ng manufacturers’ written
instructions must also be followed
by anyone modifying a roof system.
Consult the roof manufacturer's specs
and instructions prior to touching
the roof.
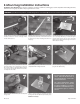
Using drill with 7/32" bit, drill pilot hole into roof
and rafter, taking care to drill square to the roof.
Do not use mount as a drill guide. Drill should be
‘long style bit’, aka ‘aircraft extension bit’ to drill a
1¾ " deep hole into rafter.
Clean off any sawdust, and ll hole with sealant
compatible with roo ng materials.
Slide the ashing into position. Insert the rubber
plug into the QBlock cavity.
Slide the washer and the L-foot (not included) onto
the lag screw.
2
3
5
4
6
8
7
1
May-2017 Rev 6
E-Mount Lag Installation Instructions
Installation Tools Required: tape measure, roo ng bar, chalk line, stud nder, caulking gun, sealant compatible with roo ng materials,
drill with 7/32" long-style bit, drill or impact gun with 1/2" socket.
Locate, choose, and mark centers of rafters to be
mounted. Select the courses of shingles where
mounts will be placed.
Carefully lift composition roof shingle with roo ng
bar, just above placement of mount. Remove nails
as required. See "Proper Flashing Placement" on
next page.
Insert ashing between 1st and 2nd course. Slide
up so top edge of ashing is at least 3/4" higher
than the butt-edge of the 3rd course and lower
ashing edge is above the butt-edge of 1st course.
Mark center for drilling.
Using a 1/2 inch socket on an impact gun drive
the lag screw until the QBlock stops rotating easily.
DO NOT over-torque.
BI 7.2.3-31
WARNING: Quick Mount PV products are NOT designed for and should NOT be used to anchor fall protection equipment.