
Installation Manual


BI 7.2.3-44
June 2018, Rev 4
6
1
3
4
6
2
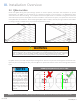
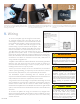
Remove Nails: Use roong bar to break seals
between 1st and 2nd and 3rd shingle courses.
Be sure to remove any obstructing nails to allow
correct placement of the QBox.
7
Slide the QBox ashing up underneath the second
course of shingles, so that the bottom edge of the
ashing does not overhang the front edge of the
shingle and the top edge extends up into the third
course of shingles.
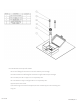
Mark Conduit Location: If not using attic conduit
exit, complete only step 6-8 and 11-12. Otherwise,
remove the conduit cap and blank and set aside.
mark the location to drill the conduit pass-
through with a lumber crayon or other marking
device.
Drill Conduit Hole: Remove QBox ashing and
drill 1" hole at location marked in Step 3. Use
either a spade bit or hole saw. Avoid all electrical
components on underside of deck in the attic.
Reinstall Flashing: Reinstall the QBox assembly
such that the conduit tting in the center of the
box aligns with the hole you created in step 4.
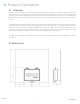
IV. Installation
5
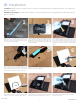
Clean: Clean debris from roof to ensure the
ashing is as at as possible against the roof
surface and clean for adhesion.
7
8
Caulk: Fill the fastener holes with appropriate
sealant.
Tool Specs: Shingle ripper bar, lumber crayon, 1" spade pit, hand broom, caulk gun, appropriate sealant, 1/2" nut driver, #3
phillips screw driver.
Side Mount Conduit Exit: For side mount conduit exit, where transition wires leave the QBox from the side of the box, skip
steps 3-5 and 8-10.
9
Install Conduit: Install the supplied conduit
nipple through the QBox and the roof with the
ared end facing up.
Optional Caulk: Apply an upside down U-shaped
bead of sealant to the underside of the ashing
before insertion. Do not use excessive sealant.