
Installation Manual


BI 7.2.3-44
June 2018, Rev 4
BI 7.2.3-44
June 2018, Rev 4
1
3
4
2
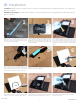
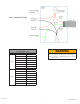
Holes for Cord Grips: Use the drill starter along
the perimeter of the box to guide your hole saw.
Hole size is specied by the cord grip or conduit
hub manufacturer. Clean o all burs.
6
Attach Cord Grips: Install the cord grips and
tighten them to the enclosure to make the
watertight connection. Ensure all wires are de-
energized. Properly label the wires following
NEC guidelines.
Install PV Wires: Pull PV system wiring through
the cord grips and tighten the cord grips to seal
around the wires making a watertight connection.
Ensure each wire has a minimum of 6" of lead
inside the box per NEC requirements.
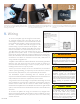
Install Output Wires: Transition wires may
have pulled when the transition ttings were
installed. If not, do so now, and label all wires
appropriately. Strip sheathing from the end of all
wires per instructions found in Section VI. Ensure
each wire has a minimum of 6" of lead inside the
box.
Holes for Conduit: Use the drill starter along
the perimeter of the box to guide your hole saw
specied by the conduit hub manufacturer.
Clean o all burs. Attach the conduit to the box.
Ensure that conduit cap and blank are installed.
5
Connect Wires: Install Approved wire connectors.
Refer to Section VI for allowable wiring
combinations.
10
7
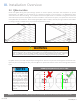
Tool Specs: Appropriate weather tight conduit ttings and cord grips, hole saw, adjustable crescent wrench, wire strippers
and cutters.
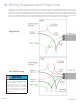
Congurations Shown: The following installation steps are for a single string transition using cord grips for the home run
cables from the PV system. There are two ways to transition wiring from the QBox. The rst is through the attic using the
QBox’s pre-installed, conduit pass-through with the patented Elevated Water Seal Technology® (steps 4-6). The alternative
method is to leave the QBox from the side (steps 7-9).
8
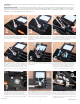
Connect Wires: Pull min 6" of transition wiring
into the QBox, label all wires, and strip sheathing
from the end of all wires per the instructions of
the manufacturer of the connectors being used.
Follow step 6 to complete the installation.
Ground: Since the QBox is non conductive, it
does not need to be grounded. However, for
NM style connections or if required by an AHJ, a
ground wire termination can be accomplished by
installing a grounding lug on the conduit lock ring
using the bolt provided.
Push Wires Into Box: Push wires down into the
box and away from the lid. Lid should close freely
without wire interference. Failure to do so will
prevent proper rainproong of the enclosure,
voiding the warranty and possibly leading to
a short. Secure the lid per step 12 in section IV.
9