
Installation Guide


Using a cuto wheel in a grinder, score the slate
above the mounting area at 4 inches above the
center of the QBase location. In step 5, you will
remove the slate below the score line, which
will allow you to slide the ashing up under the
remaining slate in step 10.
2
7
1
Installation Instructions for Slate Roof
Installation Tools Required: tape measure, slate roo ng bar AKA slate ripper, chalk line, stud nder, caulking gun and sealant
compatible with roo ng material, drill, 4" diameter diamond embedded hole saw, masonry drill bit matching size of hole saw pilot
drill bit, grinder with cuto wheel, hammer, 7/32" high speed drill bit, and impact gun with 1/2" socket
Mark the centerline of the rafter. To mark the location of the QBase, position the
bottom edge of the ashing ush with or just
above the butt edge (drip) of the slate, the top
edge extended up under the 3rd course, and the
cone centered over your rafter centerline.
WARNING: Quick Mount PV products are NOT designed for and should NOT be used to anchor fall protection equipment.
Using a 4" diameter diamond hole saw and the
pilot hole drilled in step 3, drill through the existing
slate.
6
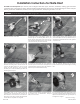
Using QBase (item 2) as a guide, align two
clearance holes vertically with the center of the
rafter. Mark the center of these 2 holes. Drill 7/32"
pilot hole at each of the 2 marks. Hold drill square
to rafter. Do not use QBase as a drill guide.
Fill pilot holes with sealant compatible with roof-
ing material such as Chemlink M-1, Geogreen
4500, or Solar Seal 900.
8
BI7.2.3-14
Feb-2013, Rev 5
4
Prior to mounting to the roof, seat the grade-8 cap
screw (item 1) through bottom of QBase. Secure the
QBase to the rafter with (2) 5/16" lag screws (item 3)
and tighten to a snug t.
9
3
Using a masonry drill bit, drill a pilot hole at the
center of the QBase location you marked in step 2.
This drill bit should match the size of the guide bit
of your hole saw.
continued on next page
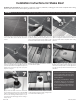
To remove the slate below the score, slightly lift
the lower portion of slate with a slate ripper, then
gently but rmly tap the top piece with a hammer.
The lower piece should break o cleanly.
5
Butt edge
3rd course