
QMCPC A Installation Guide

Slide ashing into place over drilled hole and
apply a bead of sealant across the top side of the
ashing under the 2nd shingle course. Be careful
not to rip or tear shingles.
Under the 3rd course and through the 2nd
course, secure ashing with 2 roong nails at the
top corners of the ashing at the nail line. Apply
sealant over nail heads.
2
3
5
4
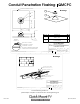
Cut EPDM collar (item 2) to appropriate conduit
size (see Drawing 1, Detail A on reverse). Take
care to cut a clean, level line.
6
1
Apr-2013, Rev 4
925-478-8269 www.quickmountpv.com info@quickmountpv.com
2700 Mitchell Dr., Bldg 2 Walnut Creek, CA 94598
Conduit Penetration Flashing Instructions
Installation Tools Required: tape measure, caulking gun, roof material & EPDM compatible sealants, drill with paddle bit, hook blade, hammer,
roong nails
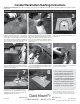
Mark center of rafter. Using the ashing as a
template, mark the drill point so the ashing
reaches up into the 3rd shingle course. Drill your
conduit hole next to the rafter so you can secure
the conduit below the roof surface (see Drawing
2). For 1/2" conduit, drill 7/8" hole; for 3/4" conduit,
drill 1" hole; for 1" conduit, drill 1-1/4" hole.
Slide ashing (item 1) into position centering the
ashing hole with drilled hole. Remove any nails
that prevent getting the ashing into position.
Using a hook blade, cut shingle around cone to
allow correct placement of ashing. Flashing
should not hang over bottom (drip) edge of
shingle below.
Apply sealant compatible with the roong
material on the underside of the ashing in an
upside down U.
BI 7.2.3-22
WARNING: Quick Mount PV products are NOT designed for and should NOT be used to anchor fall protection equipment.
Your conduit penetration ashing
is now complete and ready for ad-
ditional electrical work. Be sure to
secure conduit to rafters below the
roof surface per local building codes
and NEC code requirements. Quick
Mount PV conduit mounts are also
available for roof surface conduit at-
tachments. See website for details.
Apply a bead of sealant compatible with both
the roong material and EPDM rubber to both
the ashing and the conduit in the location of
the EPDM collar's nal position.*
7
Slide collar over the conduit all the way down to
the ashing.
8
*Helpful hint: to see where to apply the sealant, slide
the collar into place and mark the perimeter with a
marker on the ashing and on the conduit, then slide
the collar up and apply sealant just inside both marks.
©2013 by Quick Mount PV. All rights reserved.