
Installation Guide


BI 7.2.3-39
Apr-2019, Rev 2
BI 7.2.3-39
Apr-2019, Rev 2
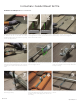
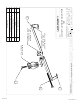
Insert the 4" tap bolt through the slot on the bottom
clamp and into the threaded hole on the end of the
top clamp. Use a 7/16" socket wrench to thread the
screw.
Tighten until the top clamp hook end unbends and
is at a 90° angle to the tile.
Use the cap screw (included) to attach your pipe
clamp (not included) to bottom clamp. Works with
a variety of clamps.
Insert conduit and use a 7/16" socket to tighten
down the pipe clamp.
2
3
5
4
6
8
7
Instructions: Conduit Mount for Tile
Installation Tools Required: 7/16" socket wrench.
Determine the tile that the mount will be installed
on. Remove the tile or tiles from the course
immediately above that tile. Hook the top clamp
over the top edge of the tile.
The top clamp is reversible. Use the wider hook end
on tiles greater than 1" thick, use the thinner hook
end on tiles less than 1" thick.
Slightly li the bottom of the tile and slide the
bottom clamp over the bottom edge of tile.
The installation process on any form of curved tile
is the same. Make sure that the conduit mount is
installed onto the crown (high point) of the tile not
in the valley.
1
9
Install mounts as needed to support conduit across
the roof.
thicker than 1"thinner than 1"