
Installation Guide

925-478-8269 | www.quickmountpv.com | info@quickmountpv.com
2700 Mitchell Dr. | Walnut Creek, CA 94598
Apr-2019 Rev 12BI 7.2.3-8 Apr-2019 Rev 12BI 7.2.3-8
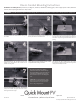
Using drill with 1/8" bit, drill pilot hole into roof
taking care to drill square to the roof. Do not use
mount as a drill guide.
Clean o any sawdust, and ll hole with sealant
compatible with roo ng materials.
Lift shingle and slide conduit mount into place.
Prepare lag bolt with sealing washer and single hole
clamp (not included) as shown.
2
3
5
4
6
7
1
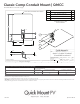
Classic Conduit Mounting Instructions
Installation Tools Required: tape measure, roo ng bar, chalk line, stud nder, caulking gun, 1 tube of appropriate sealant, drill with
1/8" bit, drill or impact gun with 7/16" deep socket.
Choose placement of conduit mounts along path
of conduit.
Lift composition roof shingle with roo ng bar, just
above placement of conduit mount.
Slide conduit mount into desired position. Remove
any nails that con ict with getting the mount ush
with front edge of shingle course. Mark center for
drilling.
WARNING: Quick Mount PV products are NOT designed for and should NOT be used to anchor fall protection equipment.
Insert lag through hole in block, and position
clamp over conduit. Using drill with 7/16" socket,
drive lag until block is tight.
All roo ng manufacturers’ written
instructions must also be followed by
anyone modifying a roof system. Please
consult the roof manufacturer's specs
and instructions prior to modifying the
roof.
CAUTION: Prior to installation, check
that proper screw embedment will be
achieved for the necessary site load
and roofing configurations.
©
2018 by Quick Mount PV. All rights reserved.