
Low Slope Roofs Flashing Guidelines

Jan-2017, Rev 3BI 7.2.3-5_1
QBase
®
Low Slope Mount Installation Instructions
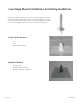
Installation Tools Required: Drill with 7/32'' bit, impact gun with 1/2'' socket, 1 tube of sealant compatible with roofing
materials, pencil, chalk line
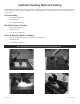
Locate the desired mount placement over a ra er (or
custom wood blocking). Using the base as a template,
mark the two penetration points with either a pen or light
drilling. Use two opposing holes on the base plate, parallel
to the structural member.
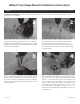
Drill both pilot holes with a 7/32-inch bit. Make sure to
hold the drill square to the ra er. The lag bolts must
be anchored into a structural member, so it is very
important to hit the center of the ra er with your pilot
holes. Fill the pilot holes with a sealant compatible with
roofing materials.
1
2
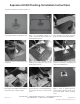
Prior to attaching the base to the roof, place the grade-8
hex bolt in the bottom of the base and screw the post (item
4) in. This is easier than adding the post a er securing the
base to the roof. Attach the base/post assembly to the roof
with two lag bolts.
3
4
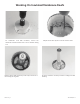
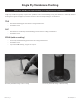
Attach the hardware to the top of the post. (Be sure to
seal o the post from weather exposure with the sealing
washer, in the interim before racks are installed.) You
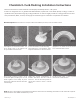
are now ready to flash the mount, roof around it, and
attach racking. Aluminum flashings for built-up roofs
are available from Quick Mount PV in 4" and 8" cones
(sold separately). For membrane roofs, be sure to use
manufacturer-specified flashing and utilize the services of
a certified roofer.
WARNING: Quick Mount PV products are NOT designed and should NOT be used to anchor fall protection equipment.