
Instructions / Assembly


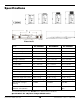
Table Of Contents
- QuickJack Manual
- Table of Contents
- Introduction
- Shipping
- Safety
- Components
- Accessories
- Specifications
- Frequently Asked Questions
- Setup
- Tools
- Selecting a Site
- Unpacking
- Air and Hydraulic Cylinders
- QuickJack Assembly Kit
- Installing the Hydraulic Elbow Fittings
- Preparing the Short Hydraulic Hoses
- Routing the Short Hydraulic Hoses
- Preparing the Long Hydraulic Hoses
- Pressurizing the Air Cylinders
- Preparing Your Power Unit
- Power Sources for VAC Power Units
- Power Sources for 12 VDC Power Units
- Installing Fittings on Your Power Unit
- Filling the Power Unit Hydraulic Fluid Reservoir
- Check the Breather Valve
- Bleed the Hydraulic Cylinders
- Test of Proper Setup
- Operation
- Maintenance
- Troubleshooting
- Wiring Diagrams
- Labels
- Parts Sheets
- Maintenance Log
- CE Documentation

QuickJack Portable Car Jack 7 P/N 5900959 — Rev. H — May 2018
Components
QuickJack components include:
• Two QuickJack Frames. The Frames, working together, raise and lower the load.
• Eight rubber Lift Blocks. Four are short (2 inches high) and four are tall (3 inches high). The
Lift Blocks can be placed on multiple locations in the Receiver Trays, allowing you to hit the
factory-recommended Lifting Points on a wide variety of Vehicles.
If you have a Vehicle with a unibody/pinch-weld frame, QuickJack recommends ordering optional
Pinch-Weld Blocks, available on the QuickJack website. If you have an SUV or truck, there
is an SUV and Light Truck Adapter available for these Vehicles, also on the QuickJack website.
• One Power Unit (includes Pendant Control). Provides power to the QuickJack Frames. There
are four Power Units available: 110 VAC, 220/240 VAC, 12 VDC, and CE-approved 12 VDC. Note
that the Hydraulic Fluid reservoir of your Power Unit is
shipped without Hydraulic Fluid
; you
must fill it with approved fluid
before
using your QuickJack.
• Two Short Hydraulic Hoses. Connect on one end to the Hydraulic Cylinder and on the other
end to one of the Long Hydraulic Hoses. Note that the Short Hydraulic Hoses
must
be routed
under the bottom of the Frame, never over the Frame.
• Two Long Hydraulic Hoses. Connect on one end to the Power Unit and on the other end to
one of the Short Hydraulic Hoses.
Tip To move your QuickJack to a different location, disconnect the Long Hydraulic
Hose from where it connects to the Power Unit, then move the Power Unit and
Frames/Hoses separately.
• Two Frame Positioning Handles. Used to easily move the QuickJack Frames, usually to
move the Frames under the Vehicle’s factory-recommended Lifting Points.
• Lock Bars. The two Lock Bars, one on each QuickJack Frame, hold the Frames in position when
they are raised—at either the First Locking Position or the Top Locking Position.
Only leave the QuickJack either fully lowered or engaged on one of the two locking positions.
Before using the QuickJack, check to make sure both Lock Bars are moving freely and are in their
tracks. If the Lock Bars get stuck in an up position or they come out of their tracks, the QuickJack
will not work correctly.