
How to Guide


Flood Gate
Example 3.
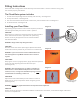
If opening is greater than 50”, additional frame may be added to decrease opening size. However, please
ensure that the screw heads do not protrude from the frame or stanchion and side rails (optional) may be
used to connect multiple units together.
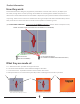
Always ensure the joints between the new frame and the existing wall/frame are
‘sealed’ with a water resistant silicone caulk to protect against water intrusion.
Apply silicone caulk on outside joints and
along bottom of the new frame.
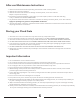
No door frame options:
Flood Gate positioned to flood side
To fit the Flood Gate in a wall where the side walls are not adequate, you will need to create a side wall
support of some kind. Using optional Side Rails as shown in Examples 1 & 4 or adding additional wood
rails (not included). See Example 5
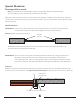
The Frame must be a minimum of 1” (25 mm) deep, to provide sufficient support to the Flood Gate edges.
Its width dimension can vary & is not critical. The height of the Frame should match the height of the
Flood Gate at 27” (680 mm).
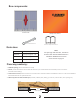
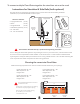
Example 5 (Wood rails):
New Frame
(not included)
Added frame
(not included)
7
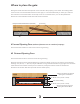
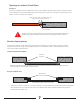
Openings too wide for Flood Gates:
Where Frames & Side Rails are fitted to the wall, the sides and bottom should be sealed with caulk
to ensure water cannot bypass the Flood Gate.
Example 4 (Optional Side Rails):
Side Rails
(optional)