
How to Guide


4
Fitting Instructions
The Flood Gate is designed to seal off doorways from flood water. It can be reused for many years,
but must be properly maintained.
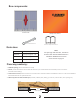
The Flood Gate system includes:
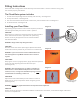
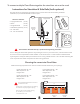
1. A metal frame expanding both horizontally and vertically - see Diagram A.
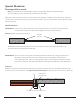
2. A neoprene sleeve - see Diagram B.
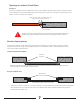
3. The rear of the sleeve allows access to the scissor jack and lower bolts - see Diagram C.
4. A ratchet wrench- see Diagram A1
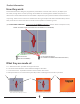
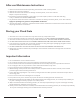
Installing your Flood Gate
By following the procedures in the correct sequence, the barrier
will take approximately 2 minutes to install in position.
STEP ONE
Ensure that your entrance is smooth and clean of dust and debris
at the vertical and base area in preparation for positioning.
Silicone caulk may be applied to uneven surfaces between
wall and Flood Gate.
WARNING - Rough surfaces may damage the sleeve.
STEP TWO
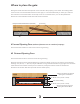
Place the barrier with its face (see Diagram B) toward the flood
threat and as close as possible to your entrance in a solid reveal.
WARNING - If you are not sure the reveal can withstand the forces
that will be applied to it you MUST seek advice from a structural
engineer.
STEP THREE
Keeping the unit in an upright position, apply downward pressure
to the unit, while adjusting the horizontal scissor jack -
(see Diagram A).
WARNING - Over extending the unit my weaken it and reduce its
effectiveness. It is recommended that expansion be no more than
5 inches (12.7 cm). If a larger unit would fit the opening, it must be
used instead of over extending a smaller unit.
STEP FOUR
Adjust each of the 4 downward pressure bolts to a maximum
depth of ¼” (7 mm) to compact the sleeve along the ground -
(see Diagram A).
WARNING - DO NOT fully tighten these bolts as this will prevent further adjustment.
STEP FIVE
Silicone caulk may be used, in accordance with the manufacturer’s instructions, on the exterior edges of the frame
to ensure a complete seal.
Diagram A
Diagram A1
Optional for rough
finish edges
Diagram C
Diagram B
WALL