
How to Guide


INSERTING BASE ASSEMBLIES
12
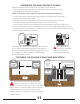
Pour and fill the hole with concrete to a depth of 4 inches from the top and tap or vibrate the concrete to
ensure it completely settles at the bottom of the hole. Position the base down into the concrete.
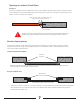
1. Align the center line marks on the angle brackets with the line marks on the center edge. (See illustration P).
2. While filling with concrete, gently tap on the very
center of the top of the base with a block of wood
or handle end of a hammer.
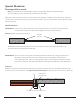
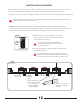
NOTE: Each base is designed with a 3” x 3” hollow square tube. At the very top of the tube and
through its rear wall, just under the threaded plate, there is a 3/4” hole in the tube. This hole allows air to
escape from the inside of the tube while the inside is filling with concrete. (See illustration O)
Ensure you clamp the center line marks together so that both angle brackets are resting flat on the
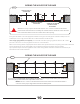
surface of the floor. (See illustration N).
It is critical that the inside of the base is
completely filled with concrete to maintain
maximum strength.
3. Ensure the top edge of angle brackets are flush with the
surface of the ground.
Do not remove the clamps and angle brackets for
at least 24 to 36 hours depending on the temperature,
humidity and soil mechanics to allow concrete to set.
AIR
RELIEF
HOLE
ILL O
RIDGED
STRAIGHT
EDGE
CLAMP (4)
(not included)
Center line mark on
face of Angle Bracket
must line up with
marks on Ridged
Straight Edge
Center line mark on
Face of front angle
Bracket
ILL P
Dimension B
from ILL J