
How to Guide


PREPARING THE OPENING
Ensure the planning and evaluation stage is complete and you have identified the products you require and
carried out any remedial work that is necessary to square and even wall reveals and ground area. If your
frame is not secure or is uneven, then installing side rails (optional) may be necessary.
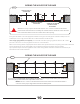
Ensure the right and left jam plates are square with the floor at least 30 inches (76 cm) high.
(See illustration E and illustration F).
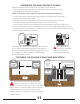
When the corners are squared, you can install the side rails. (See illustration G and illustration H).
If you are fastening against a masonry surface use a carbide tipped 5/32 inch drill bit. Use screws suitable
for wood and concrete with shields. If threading into wood you need to drill a 3/32 inch hole first.
Before you drill and install the side rail screws, you must apply a generous coat of
silicone caulk to the full length of each surface of the side rail where it comes in contact
with the backing surfaces (e.g. reveal, doorstop, jam plate, brick molding).
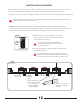
Installing the Side Rails
ILL H
When installing the tapered head screws (Use 6- 1 1/4" long x 1/4" Screws appropriate for your
wall surface- not included), ensure the heads of the screws are flush or below the top of the
counter sink. If the screws are not flush or below they will cut the outer fabric of the
Flood Gate and cause a leak.
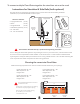
9
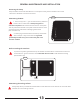
With a recessed entrance
the Floodgate System
mounts easily. Apply
silicone caulk to the
side rails which come in
contact with the property.
Squared to the walkway
and wall and screwed
into place.
Note the design of the side
rails. There is a larger access
hole for the drill bit. The cap
on top of the side rail
prevents the Flood Gate
from riding up when
tightening the tension
bolts on the lower edge of
the Flood Gate, thus reducing
the amount of horizontal
pressure required to secure
the Flood Gate in place.
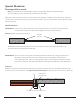
MASONRY RECESSED ENTRANCE
90º 90º
ILL F
FRONT VIEW
90º
30”
ILL E
TOP VIEW
DOOR STOP
JAM PLATE
SIDE RAILS
(OPTIONAL EXTRA)
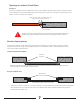
THE 2 SIDE RAILS
MUST BE IN ALIGNMENT
WELDED CAP
GOES ON TOP
RIGHT SIDE DOOR FRAME TOP VIEW
DOOR
1 1/4”
BRICK
MOLDING
SIDE RAILS
(OPTIONAL EXTRA)
DOOR JAM
DOOR STOP
APPLY SILICONE THE
FULL LENGTH OF
BOTH FACES
ILL G
ILL H
ILL H