
Installation Manual


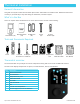

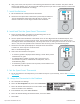


Table Of Contents

Quext Smart Thermostat and Lock 7 Installation Guide
B. Using a volt meter, test the power to the mounting plate between R and C terminals. The power must be
between 24V and 30V. If it’s not between 24V and 30V, perform a pull test to conrm that the common wire
is connected and troubleshoot accordingly.
7. Install the Batteries
A. Put the AA batteries in the Quext Smart Thermostat.
B. Conrm that the Quext Smart Thermostat is powered by the batteries.
The unit should show temperature and LoRa start to connect. The
network connection icon will begin to ash on the thermostat.
8. Install and Test the Quext Smart Thermostat
A. Secure the Quext Smart Thermostat on the mounting plate. Do not
press hard, it should easily snap into place.
B. Turn the Quext Smart Thermostat to heat mode at two or more degrees below the measured point, and
verify that warm air is coming out of the vents. Turn the Quext Smart Thermostat to AC mode at two or
more degrees below the measured point, and verify that cool air is coming out of the vents. If the air is not
warm or cold, check for possible loose connection with the wiring (refer to Troubleshooting FAQs.
C. Conrm that the LoRa symbol displays on the Quext Smart Thermostat.
If it does not, there may be a connection issue.
Refer to Troubleshooting FAQs.
D. Look at the face and observe the power.
▪ If no battery symbol is displayed either ashing or solid: 24V is present
and batteries are good.
▪ If a ashing battery symbol is present: 24V is not present, but
the batteries are good. To troubleshoot the 24V power, refer to
Troubleshooting FAQs.
▪ If solid battery symbol is present: 24V is present, but the batteries are
low and need to be replaced.
9. Set the Quext Smart Thermostat
A. Set the thermostat to the temperature you recorded at Step 2A. If you need help, refer to the IoT Resident
User Manual.
10. Assign the Thermostat in the Database
A. Go to the Quext IoT Web App.
B. Select the Site Management tab, then select Thermostats.
C. Select the desired thermostat (Dev UI/serial number should
match the number in the database).
D. In the detailed view, select Select Location.
E. Select the desired building and the desired unit, then select Done.
F. Select Save.