
User's Manual

Operation
▬▬▬▬▬▬▬▬▬▬▬▬▬▬▬▬▬▬▬▬▬▬▬▬▬▬
SafeCheck 200 Operator’s Manual
11
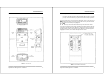
To move through the main menu use the down arrow key located behind
the belt clip. When the menu choice you want
is highlighted, press the I/O key to select that
choice. ZERO is always the first highlighted
menu item. IF YOU ARE IN A CLEAN AIR ENVIRONMENT, you may
zero the unit at this time by pressing the I/O key. After zeroing, or if a
main menu selection is not made, the unit will automatically enter the
RUN mode in about 30 seconds.
3.4.1 Run:
Before running, you should zero and calibrate your SafeCheck 200 in a
non-hazardous area (an area away from your potentially hazardous work
space, free from heavy traffic, excessive cigarette smoke and industrial
fumes) before entering the work environment. Do not compromise safety
by failing to take these steps prior to use.
Enter the RUN mode by selecting RUN from the main menu.
Alternatively, the SafeCheck 200 will automatically go into the RUN
mode in about 30 seconds after zeroing the unit or if a main menu selec-
tion is not made with in 30 seconds after the unit is turned on.
During the RUN mode, the LCD screen displays which gas sensors you
have installed and during the BASIC mode, it
displays their respective current gas levels in
percentage. Refer to the Section 3.3 User
Modes on pages 9 & 10 for information on what is displayed for the two
different modes: BASIC or PASS/FAIL.
Pressing the I/O key once during the RUN mode will turn on the backlight
for 10 seconds. Pressing it again will display the battery voltage.
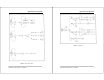
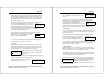
Pressing the ▲ arrow key during the RUN
mode allows you to zero the unit or change the
user mode. Press the ▼ arrow key to zero the
unit. Press the I/O key to change the user mode. Press the ▲ arrow key to
cancel and make no changes. This zero function works the same as the one
in the main menu and only allows small automatic adjustments to be made
in case the zero is being attempted in a contaminated environment.
Run Setup
Zero
Cal.
O2 LEL
20.9 0
▼=Zero I/O=User
▲=Cancel Mode
Operation
▬▬▬▬▬▬▬▬▬▬▬▬▬▬▬▬▬▬▬▬▬▬▬▬▬▬
SafeCheck 200 Operator’s Manual
12
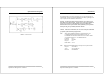
Exit the RUN mode by holding down the I/O key for three seconds. The
unit displays a message ''Session Stop In x Seconds" with a countdown.
After these three seconds, the unit will display a message "Session
Closing..." You can release the I/O key and when the session finishes clos-
ing, the unit will be in the Main Menu.
3.4.2 Zero:
Perform this operation in a non-hazardous area prior to every use to adjust
for the sensors' sensitivity changes which occur over time and after use.
Fresh, uncontaminated air is necessary for the proper outcome of this pro-
cedure. (Zero the unit away from heavy traffic, excessive cigarette smoke,
and industrial fumes.) If such an atmosphere is difficult to reach, zero air
cylinders are available.
Once you have turned on the unit, ZERO is automatically highlighted
when the screen displays the main menu. At this time you can zero the
unit's sensors by simply pressing the I/O key. We recommend that you
zero the unit at this time PROVIDED THAT YOU ARE IN A NON-HAZ-
ARDOUS CLEAN-AIR ENVIRONMENT. To reduce the chances of the
unit being zeroed in a contaminated environment only small automatic
adjustments are allowed in this main menu ZERO function. If the adjust-
ments necessary to zero the sensors are more than the unit will allow, a
message will appear indicating which sensor or sensors followed by a
"Zero Failure" message. In this case, the instrument must be zeroed under
the CAL. main menu function. If a "Zero Failure" message appears for
any sensor, the ZERO procedure is aborted and any key pressed will return
to the main menu. Unless any menu selections are made following com-
pletion of the ZERO function, the unit automatically goes into the RUN
mode after 30 seconds. Once in the RUN mode, the unit can be zeroed by
pressing the ▲ arrow key to pull up the RUN ZERO menu and the ▼
arrow to zero the unit. Remember, however, that the same small adjust-
ment range is also present in RUN ZERO.
When zeroing, the screen will display "Zeroing Unit" and then "Unit
Zeroed". This indicates that each sensor has been zeroed to the background
atmosphere. When the oxygen sensor has been zeroed in a clean air
environment, it has also been effectively calibrated since fresh air contains
20.9% oxygen.